
Building Persistable One-to-One Chat Application using Spring Boot and WebSockets
- The Tech Platform

- Jan 5, 2021
- 5 min read


we will study a popular use case of WebSockets. We will be building a one-to-one messaging application, which allows users to send private messages to each other.
The below video demonstrates what we are going to build.
Introduction to WebSockets and STOMP
A WebSocket is a protocol that allows a two-way communication between server and client. Unlike HTTP, an application layer protocol, WebSocket is a transport layer (TCP) protocol. However, HTTP is used for the initial handshake, then it is upgraded to TCP connection that is used by WebSockets. WebSockets is a low level protocol, which defines the way of transfer messages with no additional information about the incoming messages.
For this reason, the WebSocket RFC defines the use of sub-protocols to define the structure and the standards for the messages. We will be using STOMP as a sub-protocol over WebSockets.
Simple (or Streaming) Text Oriented Message Protocol (STOMP) defines a protocol for server and client to communicate with messaging.
STOMP is similar to HTTP, and works over TCP using the following commands:
CONNECT
SUBSCRIBE
UNSUBSCRIBE
SEND
BEGIN
COMMIT
ACK
The Architecture

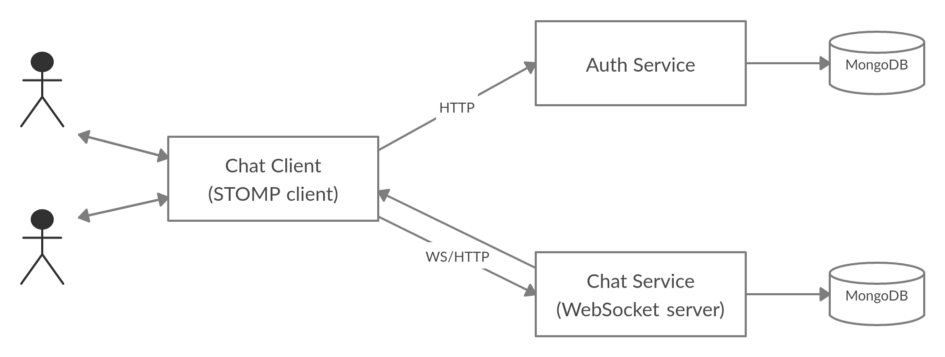
Auth Service is responsible for authenticating and managing users, we will not re-invent the wheel, we will the Auth service that we developed in the previous story.
Chat Service is responsible for configuring WebSocket, enabling STOMP message handling and, persisting and handling user messages.
Chat Client is a ReactJs application that uses STOMP client to connect and subscribe to the chat service. Also, it provides the user interface.
Define The Message Models
The first thing to think about the message model to exchange between server and client.
The Chat message model looks like:
public class ChatMessage {
    @Id
    private String id;
    private String chatId;
    private String senderId;
    private String recipientId;
    private String senderName;
    private String recipientName;
    private String content;
    private Date timestamp;
    private MessageStatus status;
}
The chat message is a pretty straightforward, it has the basic fields to identify a chat message between sender and recipient.
It also has a status field, which indicates if the message is delivered to the client.
public enum MessageStatus {
    RECEIVED, DELIVERED
    }
When the server receives a chat message, it doesn’t send it directly to the client, rather, it sends a chat notification, to notify the client there is a new message received, then the client can pull the new message. The message will be marked as delivered once the client pulls the message.
The chat notification looks like:
public class ChatNotification {
private String id;
private String senderId;
private String senderName;
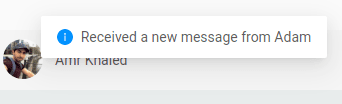
}It has the new message id and an info about the sender, so that, the client can display a new message notification or display the number of the new messages received as shown in the below images.
Enable WebSocket and STOMP in Spring
The first step to enable WebSocket is to configure the STOMP endpoint and the message broker. Create a class named WebSocketConfig and annotate this class with @Configuration and @EnableWebSocketMessageBroker, to enable WebSocket message handling, backed by a message broker.
@Configuration
@EnableWebSocketMessageBroker
public class WebSocketConfig implements WebSocketMessageBrokerConfigurer {

    @Override
    public void configureMessageBroker(MessageBrokerRegistryconfig) {
        config.enableSimpleBroker( "/user");
        config.setApplicationDestinationPrefixes("/app");
        config.setUserDestinationPrefix("/user");
    }

    @Override
    public void registerStompEndpoints(StompEndpointRegistryregistry) {
        registry
            .addEndpoint("/ws")
            .setAllowedOrigins("*")
            .withSockJS();
    }

    @Override
    public boolean configureMessageConverters(List<MessageConverter>messageConverters) {
           DefaultContentTypeResolver resolver
           =newDefaultContentTypeResolver();

           resolver.setDefaultMimeType(MimeTypeUtils.APPLICATION_JSON);
           MappingJackson2MessageConverter converter
           =new MappingJackson2MessageConverter();
           converter.setObjectMapper(newObjectMapper());
           converter.setContentTypeResolver(resolver);
           messageConverters.add(converter);
           return false;
      }
  }
The first method, configures a simple in-memory message broker with one destination for sending and receiving messages, this destination is prefixed with /user, it also designates the /app prefix for messages that are bound for methods annotated with @MessageMapping, which we will discuss in the next section. User destination prefix /user is used by ConvertAndSendToUser method of SimpleMessagingTemplate to prefix all user-specific destinations with /user.
The second method, registers /ws STOMP endpoint. This endpoint is used by the client to connect to the STOMP server. It also enables the SockJS fallback options, so that alternative messaging options may be used if WebSockets are not available.
The last method, configures a JSON message converter, which is used by Spring to convert chat messages from/to JSON.
Create a Message-handling Controller
In this section, we will create a controller that will handle user requests, it will receive a chat message from a user and send it to a recipient destination.
@Controller
public class ChatController {

    @Autowired private SimpMessagingTemplate messagingTemplate;
    @Autowired private ChatMessageService chatMessageService;
    @Autowired private ChatRoomService chatRoomService;

    @MessageMapping("/chat")
    public void processMessage(@PayloadChatMessagechatMessage) {
    var chatId = chatRoomService
    .getChatId(chatMessage.getSenderId(),
    chatMessage.getRecipientId(), true);

    chatMessage.setChatId(chatId.get());

    ChatMessage saved = chatMessageService.save(chatMessage);

    messagingTemplate.convertAndSendToUser(
          chatMessage.getRecipientId(),"/queue/messages",
          new ChatNotification(
                saved.getId(),
                saved.getSenderId(),
                saved.getSenderName())
                );
    }}
The @MessageMapping annotation ensures that, if a message is sent to /app/chat the processMessage method is called. Note that, the configured application destination prefix /app is appended to the mapping. This method, persists the message in MongoDB, then, calls convertAndSendToUser method to send the notification message to the user destination.
The convertAndSendToUser will append recipient id to /queue/messages, and also it will append the configured user destination prefix /user at the beginning. The final destination will look like:
/user/{recipientId}/queue/messagesAll the subscribers (one subscriber in our case) to the above destination, will get the message.
Generate the Chat Id
For each conversation between two users we create a chat room and generate a unique chat Id to identify the conversation between the two users.
The chat room model looks like:
public class ChatRoom {
    private String id;
    private String chatId;
    private String senderId;
    private String recipientId;
}
The chatId is generated by concatenating senderId_recipientId, for each conversation we persist two entries with the same chatId, one room, between sender and recipient and, the other one, between recipient and sender, to make sure that both users get the same chat Id.
Building the Chat Client
In this section, we will build the JavaScript client that will send messages to and receive messages from the WebSocket/STOMP server.
We will use SockJS and Stomp.js to communicate with our server through STOMP over WebSocket.
const connect=()=>{
    const Stomp=require("stompjs");
    varSockJS=require("sockjs-client");
    SockJS=newSockJS("http://localhost:8080/ws");
    stompClient=Stomp.over(SockJS);
    stompClient.connect({},onConnected,onError);
};
The connect() method establishes a connection to /ws, which is where our server waits for connections. It also defines a callback onConnected to be called upon a successful connection and, onError if an error occurred while connecting to the server.
conston Connected=()=>{
    console.log("connected");

    stompClient.subscribe(
        "/user/"+currentUser.id+"/queue/messages",
        onMessageReceived
        );
};
The onConnect() method subscribes to the user specific destination, so that, it receives all the messages sent to that destination.
const sendMessage=(msg)=>{
    if(msg.trim() !== ""){
    const message={
        senderId: currentUser.id,
        recipientId: activeContact.id,
        senderName: currentUser.name,
        recipientName: activeContact.name,
        content: msg,
        timestamp: newDate(),
        };

    stompClient.send("/app/chat",{},JSON.stringify(message));
    }
};
Finally, the sendMessage() method sends a message to /app/chat, which defined in our message-handler controller in the server.
Conclusion
In this story we covered all the important topics to build a one-to-one chat application using Spring Boot and STOMP over WebSocket.
We also built a JavaScript client with the use of SockJs and Stomp.js libraries.
Source: Medium.com


Thank you very much. It was really helpful. Can you please share git-hub link