
Building a video on demand application using Gatsby and AWS
- The Tech Platform

- Mar 5, 2021
- 13 min read

On-demand streaming platforms have become commonplace in the contemporary household. Powerful services like Netflix and Amazon Prime are just two examples of Over the Top (OTT) video platforms in the technology industry. Given the rapid growth of streaming services, now may be the right time for media companies to invest in building their own video on demand web application.
In this tutorial, we take a look at how to build a basic video on demand (VoD) web application by using Gatsby.js – a framework built on top of React – and Amazon Web Services (AWS). Then we will build the backend for the application using AWS Amplify, and test out the application by uploading a sample video via the AWS interface and testing it inside the application.
Understanding AWS
To build our video on demand project, we are going to use AWS and React as our stack.
Amazon Web Services (AWS) is a set of cloud-based services offered by Amazon, which can be utilized to build cloud-powered applications. They are super simple to set up, have awesome documentation (both by the creator and the community), and are reasonably priced as well. For beginners, you get $100 worth of free usage every year, which is more than enough for people who are just starting to learn how it works. AWS offers a vast variety of services, and it has a preset for almost every use case possible with a generic web application.
In this tutorial, we are going to use the Amplify microservice from AWS, which includes support for many other microservices internally like the S3, MediaConvert, and Cognito. Amplify provides a quick interface to help you get started with mobile and web applications quickly.
Using AWS and Gatsby with GraphQL
While AWS is the brains of our project, we still need a way to communicate with the user. This is where the frontend comes in. And, even though there is a normal convention to use server-side rendering to handle such use cases, server-based applications often take a hit in performance as well as offline capabilities. To account for this, we will use Gatsby and GraphQL with AWS.
Gatsby is a pre-rendering framework built on top of React. Gatsby allows you to pre-render your React code and takes the load off your users’ clients to render your application on the device. The offline plugin in Gatsby also converts your app into a full-fledged PWA with just one added line in the config file.
Important to our project, Gatsby also has awesome support for GraphQL, an open-source language used for data query and manipulation. GraphQL is a great alternative to the conventional REST framework and allows a great level of customization on how data is transmitted across the web. Gatsby uses GraphQL on its data level to boost performance.
Now that we have a basic understanding of our tech stack, let’s begin with the tutorial.
Getting started with a VoD application
Setting up the AWS backend requires a client available for testing; for our example, we will be using Gatsby.
Setting up a basic Gatsby project
The prerequisites for setting up a Gatsby project are simple: you need the latest nodejs version installed on your system, along with a global installation of the gatsby-cli.
Follow these quick steps to set up the environment:
Install nodejs from their website. Specific instructions will depend on your operating system.
Once node is installed, install the git client on your machine. Specific instructions, once again, will depend on your operating system.
Install the gatsby CLI globally:
npm install -g gatsby-cliCheck the installation:
gatsby --helpOnce these things are done, you can move on to creating a new project to work on. While there are a great number of starters available in Gatsby, for our purposes, it will be easier to use a fresh installation. Run the following command to initialize a new project in Gatsby:
gatsby new vod-appAt this point, we will have a barebones Gatsby application that is ready to be customized to include video on demand capabilities. To allow users to be able to stream video content using the application, we are going to add a page in the application that can stream a video using the identifier provided in the URL.
Creating the video player component
First, create a new file in your pages folder on the location src/components/player.js. This file will house a player built on top of Video.js, a library that supports video streaming and playback in JavaScript environments.
Streaming using the VoD support from AWS is facilitated using m3u8 files. These files help to break down your video into smaller chunks and can be played sequentially using any HLS (HTTP live streaming) enabled video player. All players built using video-js support HLS, which is why we have chosen this library for our video streaming application.
Make sure to install the video-js package by running:
npm install video.jsHere is the code for a sample video player component based on the video-js library.
To style the video properly, you will need a default CSS stylesheet. Place the code found here at src/components/videojs.css.
You can look for other stylesheets from Video.js if you are looking for a different skin for your video player. For beginners, however, the above sheet is tried and tested.
Creating a page to house the player
With the video player component ready to go, we can now create a page to use it to stream videos dynamically. Let’s begin with a barebones React component at src/pages/video.js.
import React from "react"

const VideoPage = ({ videoId }) => {
    return <div></div>
    }

export default VideoPage
Notice the argument videoId that is expected inside the props passed to the component. This will contain the identifier of the video that is required to be played. You need to modify your gatsby-node file to instruct it to pass the value of videoId whenever a relevant request is made.
Here’s how to set that up in your gatsby-node.js file:
exports.onCreatePage = async ({ page, actions }) => {
  const { createPage } = actions
  page.matchPath = page.path

  if (page.path.match(/^/video//)) {
    await createPage({
      path: '/video',
      matchPath: '/video/:videoId',
      component: page.component,
      }
    )
  }
}
Once this is done, update your video.js file with the following code:
import React from "react"
import VideoPlayerJS from './../components/player';

const VideoPage = ({ videoId }) => {
    return <div
        style={{
            width: '98vw',
            height: '100vh',
            display: 'flex',
            flexDirection: 'column',
            alignItems: 'center',
            justifyContent: 'center'
         }}>
             <div>
                 <VideoPlayerJS
                    autoplay={false}
                    width={"640px"}
                    height={"360px"}
                    id={videoId}
                    />
              </div>
      </div>
     }

export default VideoPage
This passes in the video id coming from the URL of the page to the video player component, which will then fetch the video from the AWS CDN and stream it for viewing.
Creating a common list of available videos
An additional feature that you can add to your project is to be able to view the videos that are uploaded to your bucket (like on the YouTube or Netflix homepage).
To set up this list, add the following code in your src/pages/index.js file:
import React, { useState, useEffect } from "react"

const Home = () => {
  const [videos, setVideos] = useState([])

  useEffect(() => {
  // Leave this empty for now. We'll fetch the list of videos here after setting up the backend.
  })

  return (
    <div>
      <h1> Available Content: </h1>
      <ul>
          {videos.map(video => (
          <li>
            <Link to={`/${video.id}`}>{video.id}</Link>
          </li>)
          )
       }
       </ul>
    </div>)
   }

export default Home
This prepares our index page, which we will complete with an API call inside the useEffect Hook once we configure our AWS backend.
Now that we have our frontend set up, it’s time to take a look at how to build the backend for our application using AWS Amplify. We will also proceed to test out the application by uploading a sample video via the AWS interface and testing it inside of our app.
Integrating AWS Amplify
If you do not have the AWS Amplify CLI installed globally on your system, run the following command to install it:
npm install -g @aws-amplify/cliThis requires NodeJS and npm to be installed in your system beforehand, which should have already been done when you set up the frontend.
Next, log on to the AWS website and create an account for yourself. All AWS accounts come with a free tier that is sufficient to help you set up a project completely. Once you are happy with your setup and are looking to expand, AWS offers affordable pricing for scaling up.
After you have set up your AWS account, you will need to initialize an Amplify project inside your Gatsby project. To do so, run the following command in the root directory of your project:
amplify initThis will trigger a series of command-line prompts that will guide you through the process of setting up your new Amplify project. A typical set of default values would look like this:
$ amplify init

Note: It is recommended to run this command from the root of your app directory
? Enter a name for the project vodapp
? Enter a name for the environment dev
? Choose your default editor: None? Choose the type of app that you're building javascript
Please tell us about your project
? What javascript framework are you using react
? Source Directory Path:  src
? Distribution Directory Path: public
? Build Command:  npm.cmd run-script build
? Start Command: npm.cmd run-script startUsing default provider  awscloudformation

For more information on AWS Profiles, see:


? Do you want to use an AWS profile? Yes
? Please choose the profile you want to use default
Please note that you might need to set up an AWS profile if you’re using the CLI for the first time. You can find detailed information on how to configure profiles on the official AWS blog here.
Installing the VOD plugin
Once your fresh Amplify project is ready, you need to install the VOD plugin for Amplify to be able to add it to your project. The VOD plugin is an open-source npm package that allows you to scaffold a video-on-demand setup on AWS quickly. Here’s how you can install it:
npm i amplify-category-video -gThis adds a category to the available options of resources that can be provisioned via the Amplify CLI. Without this, you would have to provision multiple resources on the AWS platform manually.
Setting up a VOD resource
Once you have the video category plugin available in your system, the next step would be to add an instance of the vod category in your project, to provision the required resources on the cloud. To do that, run the following command:
amplify add videoThis will trigger another series of command-line prompts to help you set up a video resource in your project. A typical flow would look like this:
$amplify add video
? Please select from one of the below mentioned services: Video-On-Demand? Provide a friendly name for your resource to be used as a label for this category in the project: vodapp
? Select a system-provided encoding template, specify an already-created template name:  Default HLS Adaptive Bitrate? Is this a production environment? No? Do you want Amplify to create a new GraphQL API to manage your videos? (Beta) YesVideo On Demand only supports GraphQL right now.If you want to only use API for CMS then choose the default ToDo and don't edit it until later.
Additional AWS functionalities
The last two questions are important, and they involve setting up additional resources in your AWS project, which directly means spending more money. However, they do bring in some very important functionalities.
If you choose “Yes” for the production environment question, you will be taken in another series of prompts to help you set up a Cloudfront resource. Cloudfront is a CDN service offered by AWS, and it can help you provide your videos to a global audience faster. The process is simple, and efficient debugging, if needed, can be done via the AWS portal.
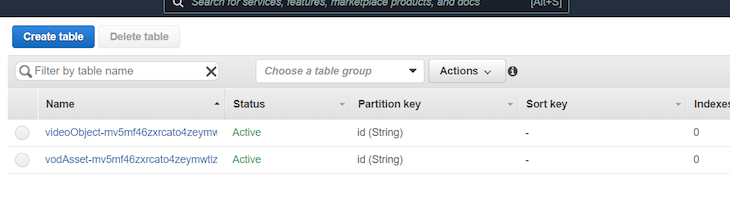
The last question asks if you want to set up a GraphQL API to manage your videos. While this might seem a little strange, the API is connected to a DynamoDB resource, and it equates to a bunch of tables that you can use in your DynamoDB database to help store the data related to the videos. Since you are trying to build a homepage that displays all videos together in one place, you will need a common table to fetch this data from. Choosing yes on that question will help you set up that resource easily.
Here’s how the process forward from this point would look like:
? Please select from one of the below mentioned services: GraphQL? Provide API name: vodapp
? Choose the default authorization type for the API API key? Enter a description for the API key: mykey
? After how many days from now the API key should expire (1-365): 7? Do you want to configure advanced settings for the GraphQL API No, I am done.? Do you have an annotated GraphQL schema? No? Choose a schema template: Single object with fields (e.g., "Todo" with ID, name, description)? Do you want to edit the schema now? No? Define your permission schema (Press *space* to select, *a* to toggle all, *i* to invert selection) Admins can only upload videos
? Do you want to edit your newly created model? NoGraphQL schema compiled successfully.
Edit your schema at vod-app/amplify/backend/api/vod-app/schema.graphql or place .graphql files in a directory at vod-app/amplify/backend/api/vod-app/schema
If you face any issue with the GraphQL compilation at this point, it is probably because you do not have a Cognito resource in your project. You can fix that by editing your GraphQL schema to match exactly the next piece of code given below:
type vodAsset @model (subscriptions: {level: public})
{
  id:ID!
  title:String!
  description:String!

  #DO NOT EDIT
  video:videoObject @connection
}

#DO NOT EDIT
type videoObject @model
{
  id:ID!
}
This completes the local setup of your Amplify project. To double-check if everything is correct, try running the following command:
amplify statusRunning this should present you with a list of resources that are available in your project. If the items shown below are not present in your project’s list, you may need to recheck if you have followed all of the above-mentioned steps:
Current Environment: dev

| Category | Resource name | Operation | Provider plugin   || -------- | ------------- | --------- | ----------------- || Api      | vodapp        | Create    | awscloudformation || Video    | vodapp        | Create    | awscloudformation |
If everything looks fine, you may begin provisioning the resources on the cloud by running the following command:
amplify pushYou might need to answer a few questions regarding your GraphQL setup, which mainly include whether you want to generate your queries/mutations once again or not, how deep nesting you require inside your resources, etc.
Once you have answered these, the upload process will begin and it will take a few minutes to completely set up the infrastructure on the cloud. Once done, you can start testing your backend with sample video uploads.
Watching things in action
You can try out the media conversion by uploading a file to the input bucket of your project. To do so, follow the steps given below:
Go to https://s3.console.aws.amazon.com/s3/home
Look for a bucket that has the words dev-input in its name

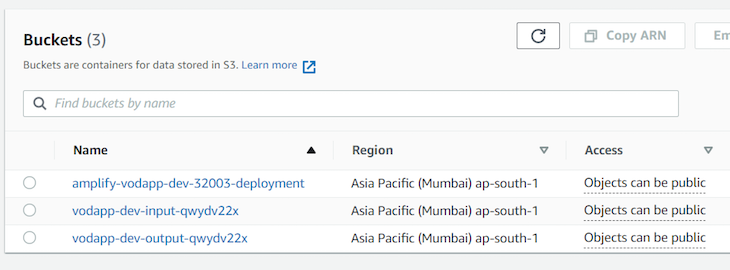
Upload a video file to the bucket
This should be enough to trigger a MediaConvert job.
To find out, you can visit the Media Convert service portal and look for your running job
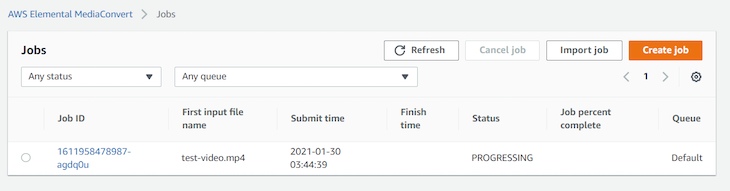
The job will take some time to complete. Once it’s done, you will be able to find the processed video, ready for streaming in your dev-output S3 bucket. Open it to view the output:

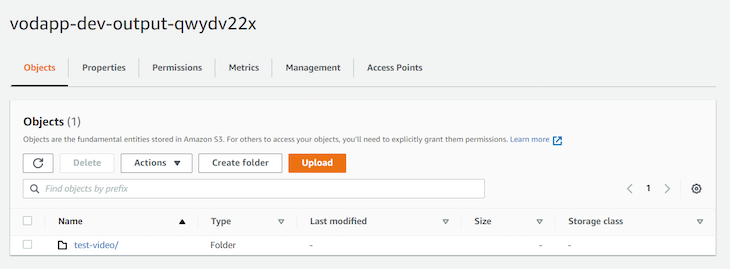
The processed video has a folder for itself. If you open it, you will find that it has been broken down into multiple small pieces of m3u8. and ts files. These files help in streaming the video to the player in small bits and adapt to the quality and size requirements of the client.


If you look for the file name test-video.m3u8, you will find a URL associated with it for public access:

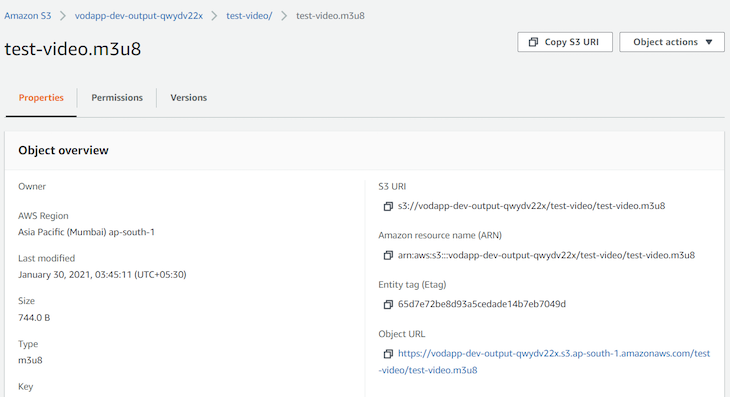
You can try pasting that URL into an HLS enabled video player like VLC or the Amplify Video Player online to try out the streaming experience. This completes our backend setup.
Connecting the backend and frontend
Now you need to connect the frontend video page that was created with a player to be able to stream this video. To do that, you need to make a very small change to your src/components/player.js file.
Remember the generateVideoLink function that was at the top of the file? It was used to build the complete video URL by using the id passed into the URL of the page. Here’s how it looks right now:
const generateVideoLink = id =>`
https://unicornflix-dev-ow6z2qfpy.s3.amazonaws.com/output/${id}.m3u8`
You need to update this to point to your output S3 bucket. Here’s how it should look like after making the change:
import awsvideoconfig from "../aws-video-exports"

const generateVideoLink = id =>`
    https://${awsvideoconfig.awsOutputVideo}/${id}/${id}.m3u8`
With this small change in place, your app can now stream the video that you have just processed into your output bucket.
Try hitting the URL and checking if your browser can stream the video or not. If not, you have probably missed out on some steps, and you need to recheck them.
Preparing the homepage to fetch the list of available videos
Now the final step that remains before you can call your project a complete video on demand client for content consumption is to be able to view the list of available videos in the app. To do this, you can use the GraphQL API that was created earlier with the VoD resource.
Follow the steps below to add video listing functionality in your application:
First of all, populate the database with some dummy data, so that you may be able to view it while testing. To do so, go to this link and look for the vodAssets table in the list.
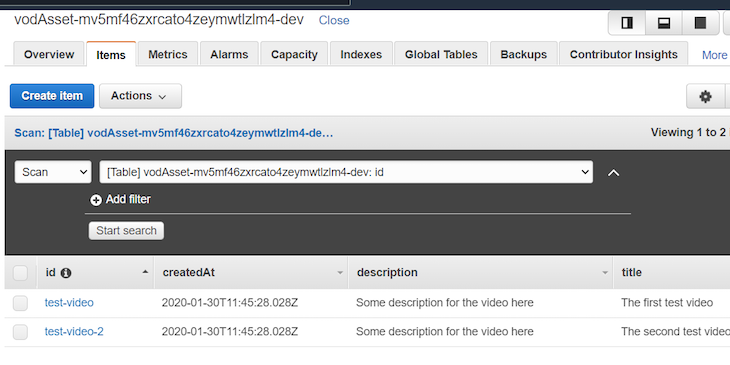
Open the table and click on the items tab. Then click on Create item and use the following JSON dump to create two objects quickly:
{
    "createdAt": "2020-01-30T11:45:28.028Z",
    "description": "Some description for the video here",
    "id": "test-video",
    "title": "The first test video",
    "updatedAt": "2020-01-30T11:45:28.028Z"
}
Note that all fields are mandatory, and the API may throw errors if any of them are not present. This is how the table will look after adding two entries:

Now that you have some dummy data to display, install the aws-amplify dependency in your gatsby project by running the following line:
npm install aws-amplifyOnce installed, look for a graphql folder inside your src folder. This is where Amplify stores all generated queries, mutations, and subscriptions. If it is not present in your project, run the following command, and choose all default options to generate the folder with the relevant queries:
amplify codegenNow, create a file at src/components/fetchVideos.js and paste the following piece of code in it:
// import the libraries
import { API, graphqlOperation } from "aws-amplify"
import awsExports from "../aws-exports"
import * as queries from "../graphql/queries"

// initialise the API client
API.configure(awsExports)

// define a function that allows you to fetch for all vodAssets in your database
const fetchVideos = async () => API.graphql(graphqlOperation(queries.listVodAssets))

export default fetchVideos
Once this is done, update your src/pages/index.js with the following code in the useEffect call:
useEffect(() => {
  // fetch the videos and set them to the state object
    fetchVideos().then(r => {
      const data = r?.data?.listVodAssets?.items
      setVideos(data)
     )},
    [])
That’s it! Now if you try to hit http://localhost:8000, you will receive a similar list:

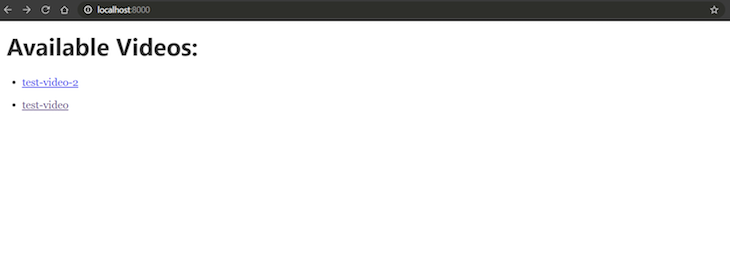
When you click on a link that has a video uploaded for the given id, you will be redirected to the video player:
To allow users to upload videos, you may want to build a simple application that uses the S3 API to facilitate upload and create a database entry for new videos. You can further explore styling the app according to your requirements, and even add additional features like reactions, live viewer count, commenting, and the like.
Wrapping up
As multiple AWS services like MediaConvert, S3, and incognito have been mentioned throughout the tutorial, it is important to understand their fundamental roles in the process. The official blog from AWS explains the services involved in the video plugin at length and can be a great asset when you are trying to understand what goes behind the scenes when you run a command as simple as adding a video resource.
Looking back at the tutorial, we covered a great amount of technical content to help set up our video-on-demand application. We started with a simple frontend client, and further added the AWS and Amplify integrations to help communicate with the backend services in no time. This serves as a great example of how simple modern cloud services have become, and how you can quickly scaffold out any business idea that you have in mind with minimal costs and efforts.
Source: logrocket
The Tech Platform


Comments