
Building A Dashboard With ASP.NET Core And DotVVM
- The Tech Platform

- Nov 12, 2020
- 8 min read
A dashboard is a tool used to visualize and track certain performance or status indicators. It condenses in one place the critical information of a machine, a company, a strategy, etc.
There are dashboards with very different objectives, from the most strategic to the most tactical. In this case, we're going to practically see how to design a dashboard to handle user data registered in a database. We will do this with ASP.NET Core and DotVVM, adapting CSS styles and some JavaScript components for the design of our administrative portal.
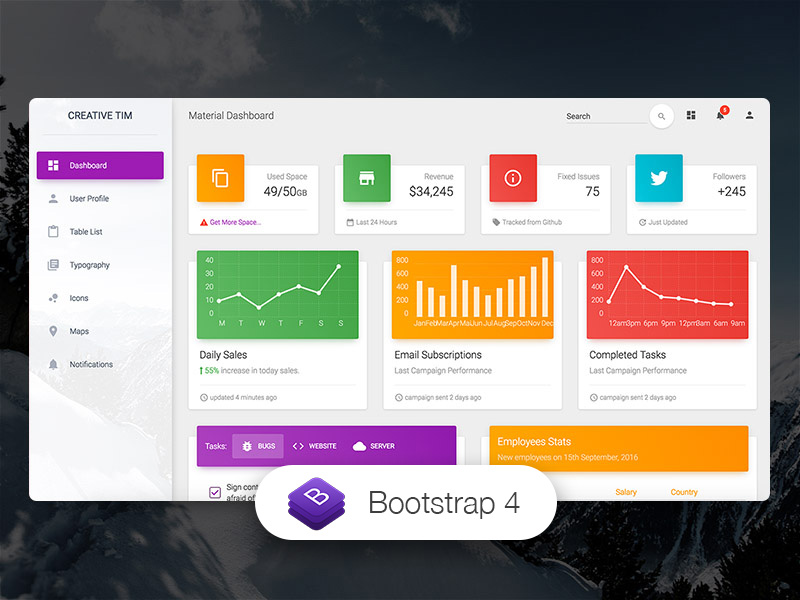
The final result will be as follows,


Note
The source code for this project can be found in the following GitHub repository: User Dashboard.
Resources and tools needed
For the construction of the dashboard, it is necessary to use a framework that allows us to communicate with the database and manage the corresponding data. In this regard, and taking advantage of the increased popularity of the .NET ecosystem, we will use ASP.NET Core through the MVVM (View-Model Model) pattern through DotVVM and with a relational database, in this case, with PostgreSQL.
Given these considerations, the resources and tools needed to establish our work environment are as follows,
Visual Studio 2019
The workload in Visual Studio 2019: Developing ASP.NET web.
DotVVM extension for Visual Studio 2019
PostgreSQL
All right, if we already have these tools installed, a good option to start building our dashboard is to look for a template of this nature that will help us with pre-defined elements and styles.
On the web, we can find multiple templates on dashboards to adapt them to our needs, some free and some paid. Here are some examples,


In this case, we will use the Material Dashboard template. This is a free Bootstrap 4-based resource with a design inspired by Google fonts.

Note
This template can be downloaded at the following address - https://www.creative-tim.com/product/material-dashboard.
In addition, it may be useful to consider a source of icons that allow us to accompany the links, buttons, and sections of our dashboard. Within Google's design materials base, we can find these icons in this direction here.
Project solution environment
For our case study, we will exemplify the design of a dashboard when handling user data through CRUD operations: Create, Read, Update, and Delete. In Visual Studio 2019 we will have the following sections,

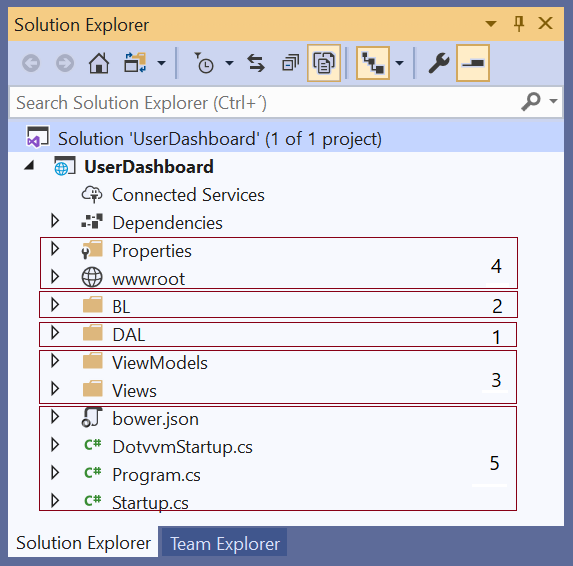
These sections have the following purposes,
Data Access Layer (DAL) implementation To handle connection and access to the relational database with PostgreSQL.
Business Layer (BL) deployment For service management and application domain logic.
Views & ViewModels For application presentation layer deployment. This section is where DotVVM comes into action for dashboard design.
wwwroot This is the folder where all static multimedia elements are located, such as CSS styles, images, JavaScript files, and more
Program, Startup, and DotvvmStartup These are the classes where project configurations are located, such as project dependencies, such as CSS styles, database connection string, services, and more.
In the following sections of this tutorial we will focus only on the design of the dashboard, that is, the Views and ViewModels. If you want to see how to create the data access layer and application logic, I'll soon publish an article about it. :)
In general, these are the methods of the service located in the logical layer of the application, which allow us to work with the database data in PostgreSQL,
GetAllUsers.
GetCountUsers
GetUserByIdAsync
InsertUserAsync
UpdateUserAsync
DeleteUserAsync
The attributes for handling user data are as follows,
Id.
Firstname.
Lastname.
Username.
City.
Country.
Postalcode.
About.
Enrollmentdate.
With this mentioned, now let's look at the design of our dashboard with DotVVM.
Dashboard design and organization
For dashboard design, this is where DotVVM comes in. Each page in DotVVM consists of two files,
A View, which is based on HTML syntax, and describes what the page will look like.
A ViewModel, which is a class in C# class that describes the state of the page (for example, values in form fields) and handles user interactions (for example, button clicks).
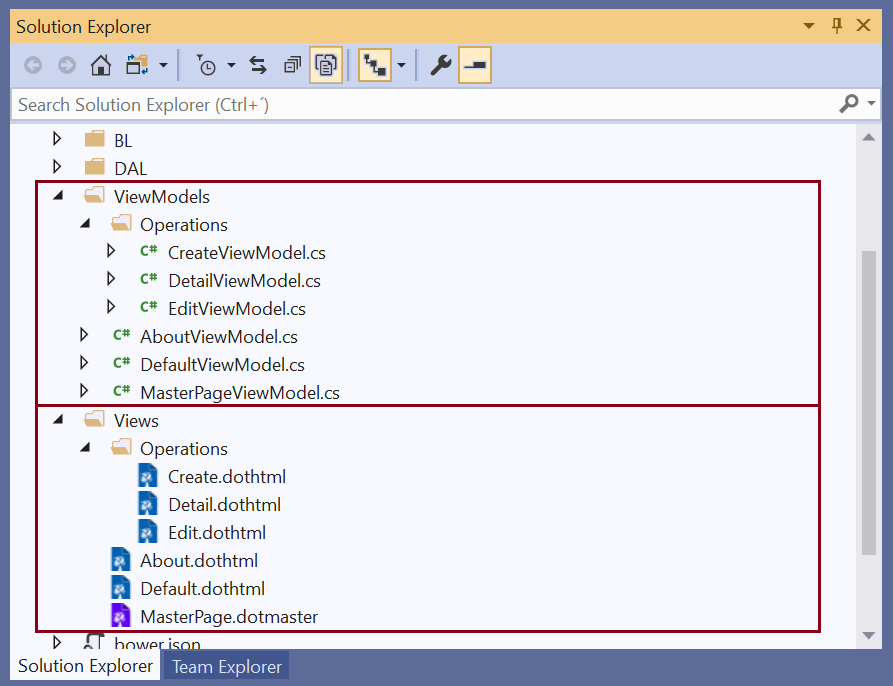
For our case we will have four Views and four ViewModels on the dashboard,
Default This will be the main page of the application where the list of registered users will be displayed.
Create A page made up of a form to create new users.
Detail To see a user's information in detail.
Edit To modify a user's information or delete it.
Considering the Views and Viewmodels files, in Visual Studio 2019 we'll see something like this,

Next, let's look at some of the main dashboard components.
Masterpage
In DotVVM, master pages are known as Masterpage, whose files have a .dotmaster extension. In this case, this page will be useful to set our HTML skeleton, import our CSS & JavaScript files, and define the contents that will be visible on all child pages.
The header of our HTML will look like this,
<head>
    <meta charset="utf-8" />
    <title>Dashboard</title>

    <meta content='width=device-width, initial-scale=1.0, shrink-to-fit=no' name='viewport' />
    <!--     Fonts and icons     -->
    <link rel="stylesheet" type="text/css" href="https://fonts.googleapis.com/css?family=Roboto:300,400,500,700|Roboto+Slab:400,700|Material+Icons" />
    <link rel="stylesheet" href="https://maxcdn.bootstrapcdn.com/font-awesome/latest/css/font-awesome.min.css">
    <!-- CSS Files -->

    <dot:RequiredResource Name="Styles" />

</head>
A particular tag is the one found under the statement <dot:RequiredResource Name="Styles" />. In DotVVM, within the configuration class called DotvvmStartUp, under the ConfigureResources method, we can specify the location of the CSS files in our dashboard so that they are organized in this section:
private void ConfigureResources(DotvvmConfiguration config, string applicationPath)
{
config.Resources.Register("Styles", new StylesheetResource()
{
Location = new UrlResourceLocation("~/assets/css/material-dashboard.css?v=2.1.2")
});
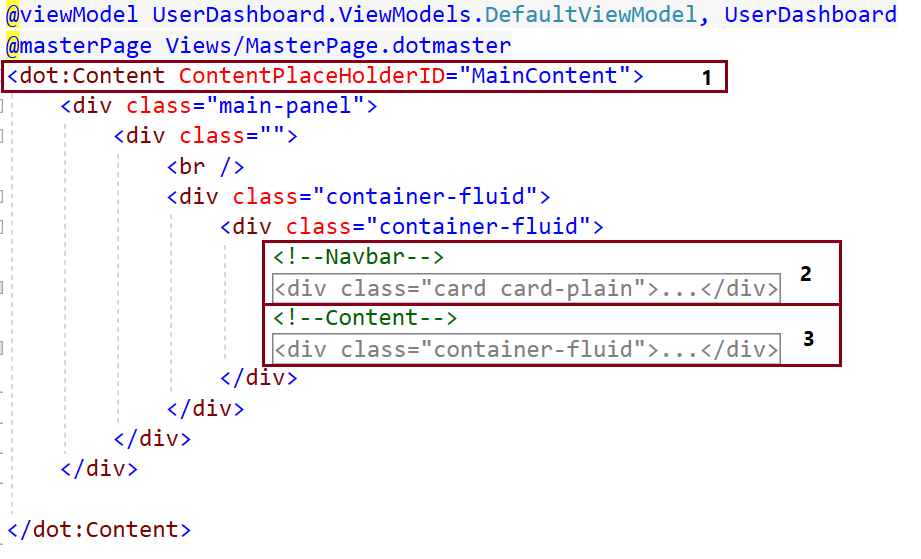
} The MasterPage with its HTML body will be displayed as follows,


Where,
Section 1, is the HTML header where you will find the page title, CSS fonts, and referenced JavaScript files, and other specifications.
Section 2, corresponds to the logo of the page, in other words, the title within it.
Section 3, is the dashboard options menu.
Section 4, is the section where all the contents of the child pages (list of records and forms of creation and modification) will be displayed.
In the dashboard, visually the results according to the numbering of the previously specified sections are as follows,


Default
Now that we have established the structure that our portal will have, now let's look at one of the child pages or also called content pages, in this case, the first section that will be displayed when loading the dashboard.
The purpose of this page is to display through a table the users who are registered in the database. In this sense, in the first part of this page we find the ViewModel,
public class DefaultViewModel : MasterPageViewModel
{
 public string Title { get; set;}
 public string Subtitle { get; set;}

 private readonly UserService UserService;

    [Bind(Direction.ServerToClient)]
 public List<UserListModel> Users { get; set; }

 public int ContUsers { get; set; }

 public DefaultViewModel(UserService UserService)
    {
        Title = "User dashboard";
        Subtitle = "In this section, you can see the list of users registered in the database.";

 this.UserService = UserService;
    }

 public override async Task PreRender()
    {
        Users = await UserService.GetAllUsersAsync();
        ContUsers = UserService.GetCountUsers();

        await base.PreRender();
    }
}
In this ViewModel class, we define the title and subtitle that the page will have. We will also have an instance of UserService, which will allow us to access the methods to retrieve a list and a counter of registered users from the database through the UserService service (implemented in the BL).
In this same class, we can locate the definition List<UserListModel> Users of type UserListModel (defined in the model classes in the BL), which will have the list of users (Id, Name, City, Country and Enrolmentdate) to load them into a table on the main page of the dashboard. In this section, an interesting statement is [Bind(Direction.ServerToClient)]. These types of properties allow you to specify which information will be transferred from the server to the client or from the client to the server when using Binding Directions. Considering the case of the list of users, in many cases, it is not necessary to transfer the entire view model in both directions. The server in view will suffice in this case.
Finally, in the ViewModel of Default we have the method PreRender(), which allows performing certain types of operations that will be carried out at the time of loading the dashboard. In this case, two queries will be made to the database through the service methods call, the first UserService.GetAllUsersAsync() to register users in a Users collection of type StudentListModel and the second UserService.GetCountUsers() to know the number of registered users. The latter aims to exemplify its use.
The second section corresponds to the View on this page.

In the first part, we find the statement <dot:Content ContentPlaceHolderIDTM"MainContent">, which specifies the identifier of this content page, which is being referenced from the MasterPage in turn.
In the second part, we have a navbar where the title and subtitle of this home page are displayed,

Finally, in a third section, we have a counter of the number of registered users and the table where these users are listed.
Only the contents of the ContUsers attribute set in the ViewModel are displayed in the counter section,
<h2 class="card-title">
   {{value: ContUsers}}
</h2> 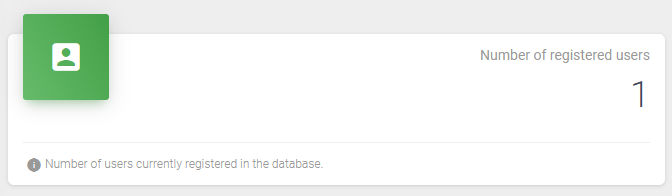
This table is designed through a GridView: <dot:GridView ... >, a DotVVM control that allows us to create a table or crew to display a certain list of information. In HTML we would be talking about the <table> tag. One of its attributes is DataSource: DataSource="{value: Users}", which allows you to specify the data source, in this case, we refer to the list of users: Users, which was defined in the ViewModel as we saw earlier.
<dot:GridView DataSource="{value: Users}" class="table">
    <Columns>


        <dot:GridViewTextColumn ValueBinding="{value: Id}" HeaderText="ID" HeaderCssClass="text-primary" CssClass="text-primary" />
        <dot:GridViewTextColumn ValueBinding="{value: Name}" HeaderText="Name" HeaderCssClass="text-primary" />
        <dot:GridViewTextColumn ValueBinding="{value: Country}" HeaderText="Country" HeaderCssClass="text-primary" />
        <dot:GridViewTextColumn ValueBinding="{value: City}" HeaderText="City" HeaderCssClass="text-primary" />
        <dot:GridViewTextColumn ValueBinding="{value: Enrollmentdate}" HeaderText="Enrollment date" HeaderCssClass="text-primary" />

        <dot:GridViewTemplateColumn>
            <dot:RouteLink Text="" RouteName="Detail" Param-Id="{{value: Id}}" class="btn btn-primary btn-link btn-sm">
                <i class="material-icons">visibility</i> Detail
            </dot:RouteLink>
        </dot:GridViewTemplateColumn>

    </Columns>
</dot:GridView>
Continuing with our analysis, in the GridView, we have the column Id, Name, Country, City, and Enrollmentdate of users, but additionally, we can also add columns to perform operations on some specific record. In this case, with 'RouteLink', we can define a hyperlink that constructs a URL from route names and parameter values to redirect us to other pages or perform additional operations, for example, see in detail the registration of a particular user according to their ID,
<dot:RouteLink RouteName="Detail" Param-Id="{{value: Id}}" /> These paths and their corresponding parameters must be defined in the DotvvmStartup.cs file in the ConfigureRoutes method as follows,
config.RouteTable.Add("Detail", "Detail/{Id}", "Views/Detail.dothtml"): Operations
Within the dashboard, there are other options for creating, modifying, and deleting a record for a particular user. In this case, to generalize, let's analyze the Create page. Like the Default page, the Create page is one that will be the child of the MasterPage.
As the name implies, this page aims to create a new user through a form within the dashboard. The result is as follows,

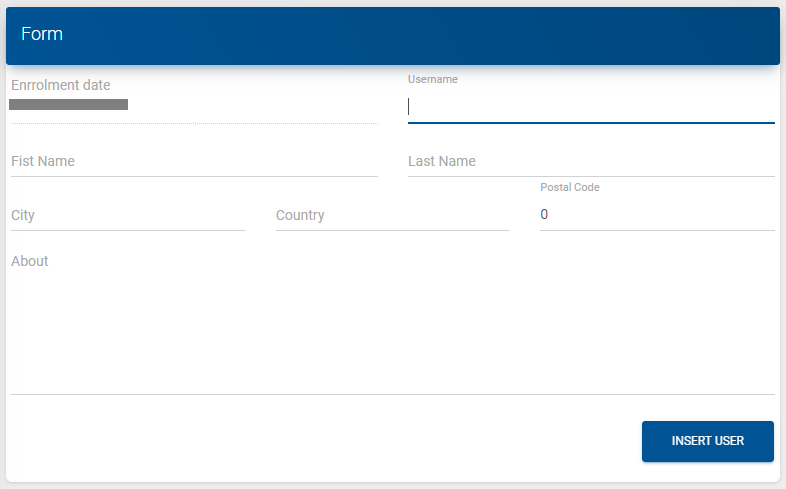
In this case, in the form, all components correspond to text boxes for data entry. Let's look at one of them, for example, the Username field in the View will be as follows,
<div class="col-md-6">
    <div class="form-group" Validator.Value="{value: User.Username}"
            Validator.InvalidCssClass="has-error"
            Validator.SetToolTipText="true">

        <label class="bmd-label-floating">Username</label>
        <dot:TextBox Text="{value: User.Username}" class="form-control" />
    </div>
</div>
Here we can comment on two things. The first is that for text boxes we can use a DotVVM component that allows us to associate a TextBox with an attribute in the ViewModel.
public UserDetailModel User { get; set; } = new UserDetailModel { Enrollmentdate = DateTime.UtcNow.Date }; We can also accompany this TextBox with a control called Validator, which allows us to validate certain characteristics, for example, that the field cannot be registered as null. In these two components, we can add additional specifications, such as the corresponding styles for each case.
The send button will follow the same logic,
<dot:Button Text="Insert User" Click="{command: AddUser()}" class="btn btn-primary pull-right" /> This button, set through a DotVVM component, is calling a function set in the ViewModel to add a user based on the data inserted into the form. This function is structured as follows,
public async Task AddUser()
{
    await UserService.InsertUserAsync(User);
    Context.RedirectToRoute("Default");
}
In this case, by inserting the log successfully, from the ViewModel we can redirect to the Default page (page with the list of registered users) and display the new user inserted into the database and displayed in the general list.
As mentioned earlier, the detail and editing pages follow the same design logic in this case.
What's next?
With this tutorial article, we learned in general how to work with ASP.NET Core and DotVVM through Visual Studio 2019 for designing a dashboard about a user entity.
The code in this tutorial can be found in the following repository on GitHub: User Dashboard.
Additional resources
Today there are many applications that we can build in the .NET ecosystem, and even more specifically in the area of web page development. In this sense, below are some additional resources to further acquire knowledge in this field,
Deploy DotVVM and .NET Core web applications to Azure (Everything you need to know)
Working with web services through ASP.NET Core and DotVVM (A step by step guide)
Thank you so much for reading. If you have any questions or ideas that you need to discuss, it will be nice to be able to collaborate and together exchange knowledge with each other.
Source: C# Corner


Comments