
Add Custom Tabs and Groups to the Ribbon on SharePoint using CSOM PowerShell
- Nakkeeran Natarajan

- Feb 21, 2019
- 2 min read
In this post, you will learn how to add custom ribbon tabs, ribbon groups and ribbon items (user actions) for for list using CSOM Powershell on SharePoint 2013 / SharePoint 2016 / SharePoint online sites.
Steps Involved: The following prerequisites are required to be executed, before going for any operations, using CSOM PowerShell on SharePoint sites.
Add the references, using the Add-Type command with the necessary reference paths. The necessary references are Client.dll, Client.Runtime.dll and publishing.dll.
Add-Type -Path "C:\Program Files\Common Files\microsoft shared\Web Server Extensions\16\ISAPI\Microsoft.SharePoint.Client.dll"
Add-Type -Path "C:\Program Files\Common Files\microsoft shared\Web Server Extensions\16\ISAPI\Microsoft.SharePoint.Client.Runtime.dll"
Add-Type -Path "C:\Program Files\Common Files\microsoft shared\Web Server Extensions\16\ISAPI\Microsoft.SharePoint.Client.Publishing.dll"
Initialize the client context object with the site URL.
$siteURL = ""
$ctx = New-Object Microsoft.SharePoint.Client.ClientContext($siteURL)
If you are trying to access SharePoint Online site, then you need to setup the site credentials with the credentials parameter and load it to the client context.
# Not required for on premise site - Start
$userId = "" $pwd = Read-Host -Prompt "Enter password" -AsSecureString
$creds = New-Object Microsoft.SharePoint.Client.SharePointOnlineCredentials($userId, $pwd)
$ctx.credentials = $creds
# Not required for on premise site - End
If you are trying to access the SharePoint on premise site, then the credentials parameter is not required to be set to the context but you need to run the code on the respective SharePoint Server or you need to pass the network credentials and set the context.
# Credentials for on premise site - Start
$pwd = Read-Host -Prompt "Enter password" -AsSecureString
$creds = New-Object System.Net.NetworkCredential("domain\userid", $pwd)
$ctx.Credentials = $creds
# Credentials for on premise site - End
We will see, how we can add the custom ribbon tabs and other components to the SharePoint list ribbon.
Get the existing user action collection. Access the Web and get the existing user actions, using UserCustomActions property. Load and execute the property.
Add new custom action to the user actions collection. The necessary parameters for new action are registration ID, title, registration type and location. Here we need to set the ribbon tab values.
Registration ID - Corresponding List template ID to add the user action. For example, here 100 denotes the custom list templates.
Registration Type - Denotes association type.
Location - Custom action location.
Build the XML for the new extension. The following are the steps considered.
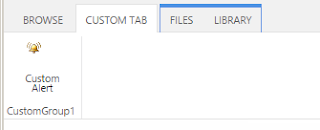
New custom tab has been added to the ribbon.
Then new group has been associated with the tab created.
Then custom control (button) is added to the group created.
Update and execute to see the changes.
The XML extension contains the following elements.
New definition for tab with specified ribbon location. The tab will contain scaling and groups components.
The scaling will denote the behaviour of tab (sizing). Size is associated to the layout title under the group template.
The groups can have one or more group elements. Each group will have the properties like title, description, template (associated to group template) and id. And group also contains controls to be associated. The controls can button, label, etc.
- For each control, set the necessary parameters. The command parameter is associated to UIHandler. The TemplateAlias should match alias name defined for the control under group template.
Another definition for group template needs to be created. Here, the new template details for the group, layout mapping and display mode (size) for controls are defined.
The UIHandler section contains necessary javascript function for the controls defined.
The following piece of code shows the operation with necessary XML. $web = $ctx.Site.RootWeb
$userActions = $web.UserCustomActions
$ctx.Load($userActions)
$ctx.ExecuteQuery()
$newRibbonItem = $userActions.Add()
$newRibbonItem.RegistrationId = "100"
$newRibbonItem.Title = "Custom Ribbon Tab" $newRibbonItem.RegistrationType = [Microsoft.SharePoint.Client.UserCustomActionRegistrationType]::List
#$newRibbonItem.Id = "Ribbon.CustomTab"
$newRibbonItem.Location = "CommandUI.Ribbon"
$ribbonUI = '<CommandUIExtension>
<CommandUIDefinitions>
<CommandUIDefinition Location="Ribbon.Tabs._children">
<Tab Id="Ribbon.CustomTab" Title="Custom Tab" Description="Custom Tab with groups and user action" Sequence="100">
<Scaling Id="Ribbon.CustomTab.Scaling">
<MaxSize Id="Ribbon.CustomTab.CustomGroup1.MaxSize"
GroupId="Ribbon.CustomTab.CustomGroup1"
Size="LargeLayout" />
</Scaling>
<Groups Id="Ribbon.CustomTab.CustomGroups">
<Group Id="Ribbon.CustomTab.CustomGroup1"
Description="Collection of user actions"
Title="CustomGroup1"
Sequence="20"
Template="Ribbon.Templates.LargeLayout">
<Controls Id="Ribbon.CustomTab.CustomGroup1.Controls">
<Button Id="Ribbon.CustomTab.CustomGroup1.ShowAlert" Alt="Show Alert" Sequence="101"
Command="ShowRibbonAlert"
LabelText="Custom Alert"
Image32by32="_layouts/15/images/alertme.png"
Image16by16="_layouts/15/images/alertme.png"
TemplateAlias="ButtonTemplate" />
</Controls>
</Group>
</Groups>
</Tab>
</CommandUIDefinition>
<CommandUIDefinition Location="Ribbon.Templates._children">
<GroupTemplate Id="Ribbon.Templates.LargeLayout">
<Layout Title="LargeLayout" LayoutTitle="LargeLayout">
<Section Alignment="Top" Type="OneRow">
<Row>
<ControlRef DisplayMode="Large" TemplateAlias="ButtonTemplate" />
</Row>
</Section>
</Layout>
</GroupTemplate>
</CommandUIDefinition>
</CommandUIDefinitions>
<CommandUIHandlers>
<CommandUIHandler Command="ShowRibbonAlert"
CommandAction="javascript:alert(''hi'');"/>
</CommandUIHandlers>
</CommandUIExtension >'
$newRibbonItem.CommandUIExtension = $ribbonUI
$newRibbonItem.Update()
$ctx.Load($newRibbonItem)
$ctx.ExecuteQuery()
The following image shows the tab along with group and control.


Comments