
How To Set Background Color Of A Selected Row Based On Checking/Unchecking Checkbox In Angular 10
- The Tech Platform

- Mar 10, 2021
- 4 min read
Introduction
In this article, we will learn how to set the background color of a selected row based on checking or unchecking a checkbox in an Angular 10 application.
Prerequisites
Basic Knowledge of Angular 2 or higher
Visual Studio
Node and NPM installed
Bootstrap
WEB API
SQL Server Management Studio
Create an Angular project using the following command:
ng new rangesliderdemo Open this project in Visual Studio Code and install bootstrap using the following command:
npm install bootstrap --save Now open styles.css file and add Bootstrap file reference. To add a reference in a styles.css file, add this line.
@import '~bootstrap/dist/css/bootstrap.min.css'; Create a new service using the following command:
ng g s employee Now open employee.service.ts file and add the following lines:
import { Injectable } from '@angular/core';
import { HttpClient } from "@angular/common/http";
@Injectable({
  providedIn: 'root'
})
export class EmployeeService {

  constructor(private http:HttpClient) { }
  Getemployee()
  {
 return this.http.get('https://localhost:44357/api/Employee/Getemployee');
  }
}
Now create a new component using the following command:
ng g c employee Now open employee.component.ts file and add the following code:
import { Component, OnInit } from '@angular/core';
import { EmployeeService } from "../employee.service";
@Component({
  selector: 'app-employee',
  templateUrl: './employee.component.html',
  styleUrls: ['./employee.component.css']
})
export class EmployeeComponent implements OnInit {
  checkedList: any;
  masterSelected: boolean;
  changBackground: boolean[] = [];
  changbcolor: boolean;
  constructor(private employeeService:EmployeeService) { }
  emoloyyes:any;
  ngOnInit() {
 this.Getemployee();
  }
Getemployee()
{
 this.employeeService.Getemployee().subscribe(result =>{
 this.emoloyyes=result;
console.log(result)
  })
}
CheckedData() {
 this.checkedList = [];
 for (var i = 0; i < this.emoloyyes.length; i++) {
 if (this.emoloyyes[i]['selected'])
 this.checkedList.push({ ClientId: this.emoloyyes[i].Id });
  }
 this.checkedList = JSON.stringify(this.checkedList);

}
isAllSelected() {
 this.masterSelected = this.emoloyyes.every(function (item: any) {
 return item.selected == true;
  })
 this.CheckedData();
}
checkUncheckAll() {
 for (var i = 0; i < this.emoloyyes.length; i++) {
 this.emoloyyes[i]['selected'] = this.masterSelected;
  }
 this.CheckedData();
}
showbackcolor(id, $event, index) {
 if ($event) {
 this.changBackground[index] = true
  } else {
 this.changBackground[index] = false;
 this.changbcolor = false;
  }
}
showBackgroundColor(count) {
 if (this.masterSelected == false) {
 for (let i = 0; i < count; i++) {
 this.changBackground[i] = false;
    }

  }
 else {
 for (let i = 0; i < count; i++) {
 this.changBackground[i] = true;
    }
  }
}
}
Open employee.component.html file and add the following lines:
<div class="row" style="margin-top:10px;margin-bottom: 10px;">
    <div class="col-sm-12 btn btn-success">
        How to Set background color of selected row based on check/uncheck Checkbox in Angular 10
    </div>
  </div>
<table class="table">
    <thead class="thead-dark">
        <tr>
            <th><input type="checkbox" name="checkbox"  value="checkbox"
                [(ngModel)]="masterSelected" (change)="checkUncheckAll();showBackgroundColor(emoloyyes.length)"></th>
            <th>ID</th>
            <th>Name</th>
            <th>Type</th>
            <th>City</th>
            <th>Salary</th>
        </tr>
    </thead>
    <tbody>
        <tr *ngFor="let emp of emoloyyes; let i=index;"  [ngClass]="(changBackground[i]?'data-selected': '')">
            <td><input type="checkbox" [(ngModel)]="emp.selected"  value="{{emp.Id}}" (change)="isAllSelected();showbackcolor(emp.Id,$event.target.checked,i)"></td>
            <td>{{ emp.Id }}</td>
            <td>{{ emp.Employee_Name }}</td>
            <td>{{ emp.EmployeeType }}</td>
            <td>{{ emp.City }}</td>
            <td>{{ emp.Salary }}</td>

        </tr>
    </tbody>
</table>
Open employee.component.css file and add the following css class:
.data-selected {
    background-color: #DEEDF9;
  }
Now Open app.module.ts file and add the following code:
import { NgModule } from '@angular/core';
import { BrowserModule } from '@angular/platform-browser';
import { HttpClientModule } from '@angular/common/http'
import { AppComponent } from './app.component';
import { SliderdemoComponent } from './sliderdemo/sliderdemo.component';
import { EmployeeComponent } from './employee/employee.component';
import { FormsModule } from '@angular/forms';
@NgModule({
  declarations: [
    AppComponent,
    SliderdemoComponent,
    EmployeeComponent
  ],
  imports: [
    BrowserModule,HttpClientModule,FormsModule
  ],
  providers: [],
  bootstrap: [AppComponent]
})
export class AppModule { }
Create database and a table
Open SQL Server Management Studio, create a database named "Employee", and in this database, create a table. Give that table a name like "employeedetails".
CREATE TABLE [dbo].[Employeedetails](
    [Id] [int] IDENTITY(1,1) NOT NULL,
    [Employee Name] [nchar](10) NULL,
    [EmployeeType] [nvarchar](50) NULL,
    [Age] [int] NULL,
    [City] [nchar](10) NULL,
    [Salary] [int] NULL,
 CONSTRAINT [PK_Employeedetails] PRIMARY KEY CLUSTERED
(
    [Id] ASC
)WITH (PAD_INDEX = OFF, STATISTICS_NORECOMPUTE = OFF, IGNORE_DUP_KEY = OFF, ALLOW_ROW_LOCKS = ON, ALLOW_PAGE_LOCKS = ON, OPTIMIZE_FOR_SEQUENTIAL_KEY = OFF) ON [PRIMARY]
) ON [PRIMARY]
GO
Create a Web API Project Open Visual Studio and click on create a new project:

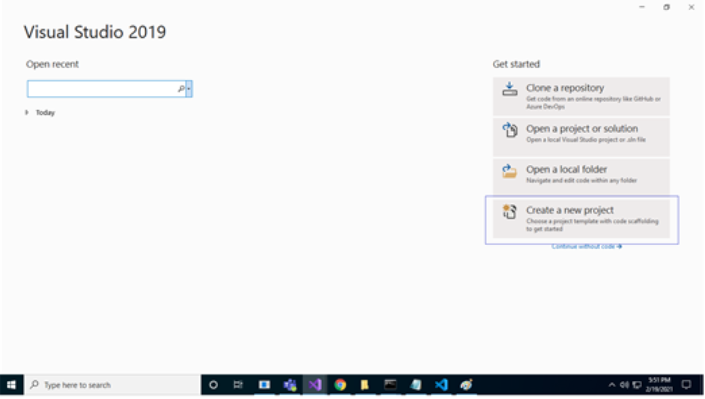
Now select the project and click on the Next button.


Now select the project name and project location and click on the Create button.


Choose Web API as the template:


Right-click the Models folder from Solution Explorer and go to Add >> New Item >> data.


Click on the "ADO.NET Entity Data Model" option and click "Add".


Select EF Designer from the database and click the "Next" button:

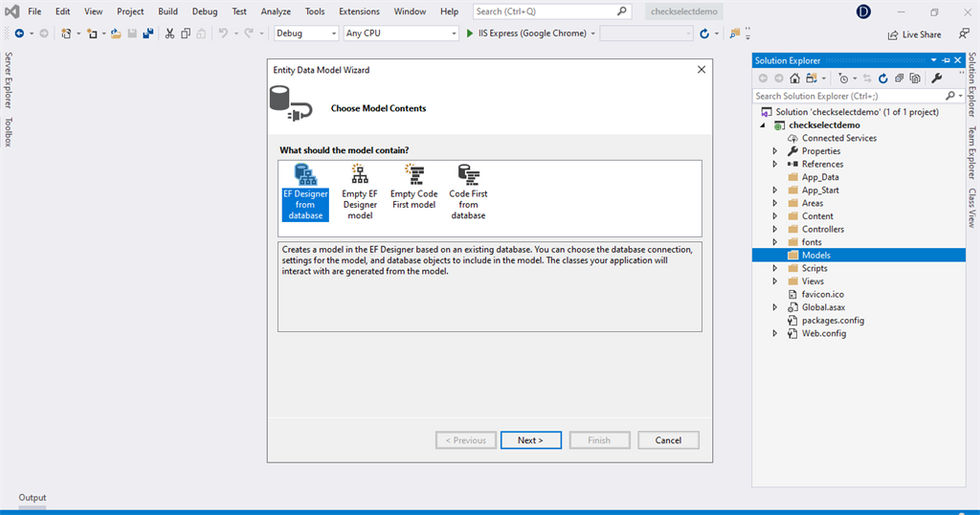
Add the connection properties, select the database name on the next page, and click OK:


Check the "Table" checkbox. The internal options will be selected by default. Now, click the "Finish" button:


Our data model is created now.
Right-click on the Controllers folder and add a new controller. Name it as "Employee controller" and add the following namespace in the Employee controller.
using checkselectdemo.Models; Now, add a method to fetch data from the database
using System;
using System.Collections.Generic;
using System.Linq;
using System.Net;
using System.Net.Http;
using System.Web.Http;
using checkselectdemo.Models;
namespace checkselectdemo.Controllers
{
 public class EmployeeController : ApiController
    {
        EmployeeEntities DB = new EmployeeEntities();
        [HttpGet]
 public object Getemployee()
        {
 return DB.Employeedetails.ToList();
        }
    }
}
Now, let's enable CORS. Go to Tools, open NuGet Package Manager, search for CORS, and install the "Microsoft.Asp.Net.WebApi.Cors" package. Open Webapiconfig.cs and add the following lines:
EnableCorsAttribute cors = new EnableCorsAttribute("*", "*", "*");
config.EnableCors(cors);
Now, go to Visual Studio code and run the project by using the following command: 'npm start'
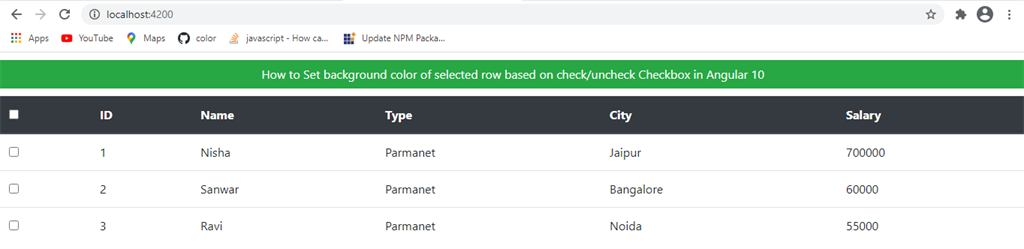

Check the checkbox in header and check all check got select and background color of table is changed

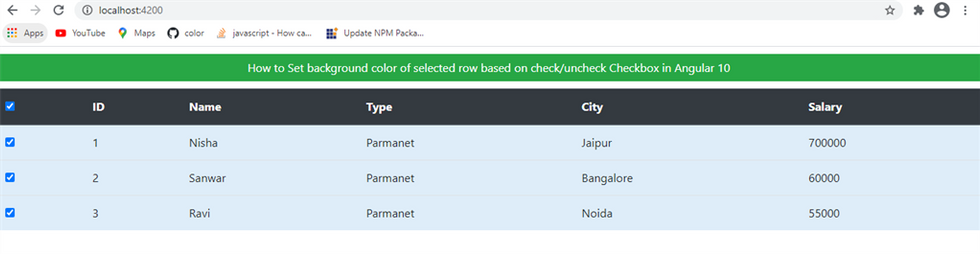
Now click on any checkbox in the table and check when we check background color has changed:


Summary
In this article, we learned how to set the background color of a selected row based on checking or unchecking a checkbox in an Angular 10 application.
Source: C#Corner - by Sanwar Ranwa
The Tech Platform


Comments