
How to manually scan individual files and folders using Microsoft Defender
- The Tech Platform

- Feb 22, 2021
- 3 min read
Every Windows 10 machine comes with Microsoft Windows Defender Antivirus pre-installed. Windows Defender is a capable antimalware and antivirus software that offers real-time system protection and data security functions on demand.

This application can take care of your security needs and it also works perfectly with other antivirus and antimalware software. The background protection is robust enough, but in some situations, you may need to scan specific files and folders for malware or viruses.
Even though Microsoft Defender continuously monitors your computer system, for ransomware and similar risks, you can still ask it to scan individual files. This post will show you three ways to scan specific files and folders with Microsoft Defender.
Scan individual files & folders using Microsoft Defender
I’ll walk you through the three best ways to scan individual files and folders with Microsoft Defender. The three ways include the following:
Using File Explorer.
Using PowerShell.
Using Command Prompt.
Those are the three methods we’ll treat. Continue reading for the complete steps for carrying out these processes.
1] Scan a specific file or folder with Microsoft Defender using File Explorer
This is the most straightforward way to scan a file or folder with Microsoft Defender.
Press the Windows key + E key combination to open File Explorer.
Navigate to the directory in which the file or folder is located. You could also get here by searching for the file or folder from the Start menu.
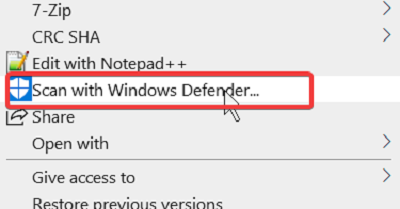
Next, right-click on it from the search results and select Open file location.
In the file’s folder, right-click on the file and select the Scan with Microsoft Defender option.
Clicking on that option will launch Microsoft Defender on its Virus & threat protection page.

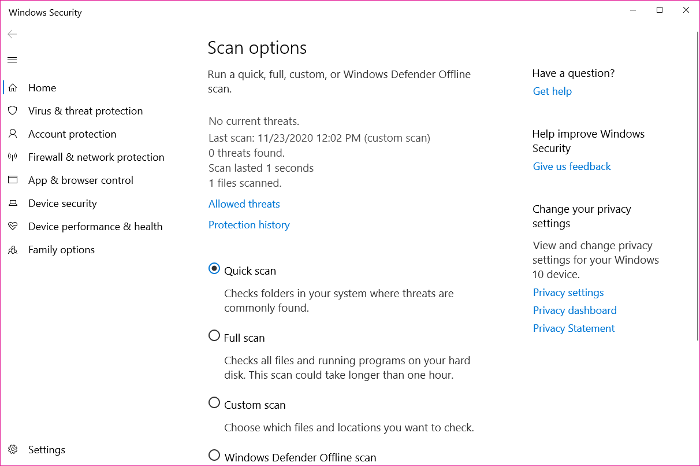
This page shows you the progress and results of your malware scans. You’ll also find other scanning modes.
A Full scan takes the longest as it checks every file on your system, as well as running processes.
The Quick scan option is quicker because it only scans the most common malware locations.
You can add the locations to scan manually using a Custom scan, but this option doesn’t work for individual files, only folders.
2] Scan a specific file or folder with Microsoft Defender using PowerShell
If you’re more of a command-line type of Windows user, you may prefer scanning the file or folder using PowerShell. Press the Windows key and search for PowerShell. Right-click on PowerShell and choose to Run as Administrator.
To scan a folder, input the command that follows in the PowerShell window and hit the ENTER key:
Start-MpScan -ScanType CustomScan -ScanPath "C:\THE\FOLDER\DIRECTORY\PATH"NOTE: Change the\THE\FOLDER\DIRECTORY\PATH part of the above command to the actual path to the file for scanning.
Unless you wish to scan the entire folder, ensure that the location leads to the specific file and not the entire folder. In this case, the path ends with a file extension.
Hence, the command will look like this:
Start-MpScan -ScanType CustomScan -ScanPath "C:\THE\FILE\DIRECTORY\PATH.extension"3] Scan a specific file or folder with Microsoft Defender using Command Prompt
You also need to run Command Prompt as an Administrator to scan files or folders with Microsoft Defender. Therefore, press the Windows key and search for cmd.
Right-click on Command Prompt and choose Run as Administrator. Type the following command inside Command Prompt and hit the ENTER key.
cd c:\ProgramData\Microsoft\Windows Defender\Platform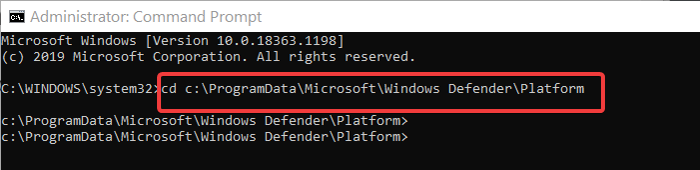
The above command takes you to the Platform folder of Windows Defender. The next step is to determine your latest version of Microsoft Defender.
Type in the following command and press ENTER.
dirOn running the above command, the Command Prompt displays the version number of the antivirus. Take note of this number.


The next command to run in Command Prompt will use the version number from the above step. Type cd, paste the number you copied, and press ENTER.
So, it will look like this:
cd 4.18.2011.6-0Next, type the following command in Command Prompt and hit ENTER. This command scans the specified folder:
mpcmdrun -Scan -ScanType 3 -File "C:\PATH\TO\FOLDER"NOTE: Change the C:\PATH\TO\FOLDER area of the above command to the path to the folder you want to scan. If you wish to scan a specific file, not a folder, change the path to that of the file. In this case, the command will end with a file extension and be in the following format:
mpcmdrun -Scan -ScanType 3 -File "C:\PATH\TO\FILE.extension"For the Command Prompt and PowerShell methods, Windows Defender will only scan the folder or files that you specified in the command. You can also take advantage of PowerShell’s Windows Defender Modules.
Source: windowsclub
The Tech Platform


Comments