
How to create custom SharePoint 2010 Application Page using Visual Studio 2010
- Vijai Anand Ramalingam

- Mar 28, 2019
- 1 min read
In this article we are going to create a custom Application Page using visual studio 2010.
Steps Involved:
Creating Empty SharePoint Project:
Open Visual Studio 2010.
Go to File => New => Project.
Select 2010 from the installed templates SharePoint and choose Empty SharePoint Project.
Name it as CustomApplicationPage.

Click Add.
Enter the SharePoint server farm URL.
Select 'Deploy it as a Farm Solution".
Click Finish.
Adding Application Page:
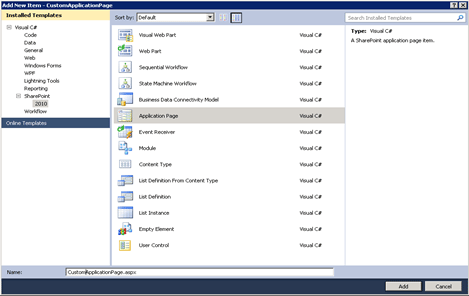
Right click the Solution Explorer and select Add a new item.
Select Application Page from the installed templates SharePoint and name it as CustomApplicationPage.
Once you add the application page it will automatically create the Layouts Folder.
In the solution explorer you could see Layouts -> CustomApplicationPage ->CustomApplicationPage.aspx.
Once you deploy the solution the pages will be automatically placed in the 14 hive layouts folder.
Open CustomApplicationPage.aspx from the solution explorer.
In the "PlaceHolderMain" add one asp label control.
And change the "PlaceHolderPageTitle" content to 'My Application Page" as shown in the following code.
<%@ Assembly Name="$SharePoint.Project.AssemblyFullName$" %>
<%@ Import Namespace="Microsoft.SharePoint.ApplicationPages" %>
<%@ Register Tagprefix="SharePoint" Namespace="Microsoft.SharePoint.WebControls"Assembly="Microsoft.SharePoint, Version=14.0.0.0, Culture=neutral, PublicKeyToken=71e9bce111e9429c" %>
<%@ Register Tagprefix="Utilities" Namespace="Microsoft.SharePoint.Utilities"Assembly="Microsoft.SharePoint, Version=14.0.0.0, Culture=neutral, PublicKeyToken=71e9bce111e9429c" %>
<%@ Register Tagprefix="asp" Namespace="System.Web.UI"Assembly="System.Web.Extensions, Version=3.5.0.0, Culture=neutral, PublicKeyToken=31bf3856ad364e35" %>
<%@ Import Namespace="Microsoft.SharePoint" %>
<%@ Assembly Name="Microsoft.Web.CommandUI, Version=14.0.0.0, Culture=neutral, PublicKeyToken=71e9bce111e9429c" %>
<%@ Page Language="C#" AutoEventWireup="true"CodeBehind="CustomApplicationPage.aspx.cs"Inherits="CustomApplicationPage.Layouts.CustomApplicationPage.CustomApplicationPage"DynamicMasterPageFile="~masterurl/default.master" %>
<asp:Content ID="PageHead" ContentPlaceHolderID="PlaceHolderAdditionalPageHead"runat="server">
</asp:Content>
<asp:Content ID="Main" ContentPlaceHolderID="PlaceHolderMain" runat="server">
</asp:Content>
<asp:Content ID="PageTitle" ContentPlaceHolderID="PlaceHolderPageTitle"runat="server">My Application Page
<asp:Label runat="server" Text="My Custom Page"></asp:Label>
</asp:Content>
<asp:Content ID="PageTitleInTitleArea"ContentPlaceHolderID="PlaceHolderPageTitleInTitleArea" runat="server" >
My Application Page
</asp:Content>
Build the solution.
Deploy the solution.
Testing:
Go to the http://servername:2010/_layouts/CustomApplicationPage/ CustomApplicationPage.aspx.
A new custom application page has been created in SharePoint 2010 as shown below.

Summary:
This article is mainly written to explain that a new template "Application Page" is available in the installed templates "SharePoint " -> "2010" and how to use that in visual studio 2010.


Comments