
How To Create Columns In A List Using REST API In SharePoint Online And Office 365
- Manpreet Singh

- Mar 4, 2019
- 1 min read
Welcome to an article on “How to create columns in a list using REST API in SharePoint Online and Office 365” where we will see the steps of creating an app using Napa Tool which will help us to create a column in a list using REST API.
Open the “NAPA” Office 365 Development Tools through your SharePoint store.
Click on Add New Project.
It will ask you, what type of app do you want to build?


Select SharePoint Add-in and provide a name to your app and click on Create.


You will see the screen below on the app,

Click on Default.aspx and paste the code below under the,“<asp:ContentContentPlaceHolderID=“PlaceHolderMain” runat=“server”>”.
Code:
Create List Column
“text” id=“createcolumnname” />
“createcolumn”>Create Column
Now on the navigation click on the App.js file and paste the code below removing the previous code completely.
Code:
‘use strict’;
var hostweblink;
var applink;
// get the links on app load
$(document).ready(function()
{
hostweblink = decodeURIComponent(
getQueryStringParameter(“SPHostUrl”));
applink = decodeURIComponent(
getQueryStringParameter(“SPAppWebUrl”)); //Define click event
$(“#createcolumn”).click(function(event)
{
createcolumn();
event.preventDefault();
});
var scriptlink = hostweblink + “/_layouts/15/”;
$.getScript(scriptlink + “SP.RequestExecutor.js”);});
//get the data and clear it in a function
function getQueryStringParameter(paramvalue)
{
var paramval = document.URL.split(“?”)[1].split(“&”);
for (var i = 0; i < paramval.length; i = i + 1)
{
var paramval1 = paramval[i].split(“=”); if (paramval1[0] == paramvalue) return paramval1[1];
}}
// Create a column in a list
function createcolumn()
{
var columnname = document.getElementById(“createcolumnname”).value;
var play;
play = new SP.RequestExecutor(applink);
//DevData is the name of my list where I want to create a column
play.executeAsync(
{
url: applink + “/_api/SP.AppContextSite(@target)/web/Lists/getbytitle(‘DevData’)/fields?@target='” + hostweblink + “‘”,
method: “POST”,
body: “{ ‘__metadata’: { ‘type’: ‘SP.Field’ }, ‘FieldTypeKind’: 2, ‘Title’:'” + columnname + “‘}”,
headers:
{ “content-type”: “application/json; odata=verbose”,
},
success: createListcolumnsuccessful,
error: createListcolumnfailure
});
}
// Success Handler
function createListcolumnsuccessful(data)
{
alert(“Column Created Successfully”)
}
// Error Handlerfunction createListcolumnfailure(data, errorCode, errorMessage)
{
alert(“Column coud not be created, view the error: “ + errorMessage);
}
Click on the settings icon on the tool on the left.
Under the properties, select Permissions and provide full control to the app on the Site Collection level.

Click on the deploy button on the left and run the project.
Click on the launch button.


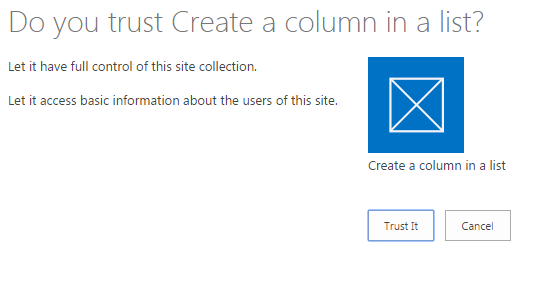
Accept the trust and click on ‘Trust It’.

Your app will be deployed and open for you as per the following screenshot:

Provide the name of the column you want to create and click on ‘Create Column’ button.
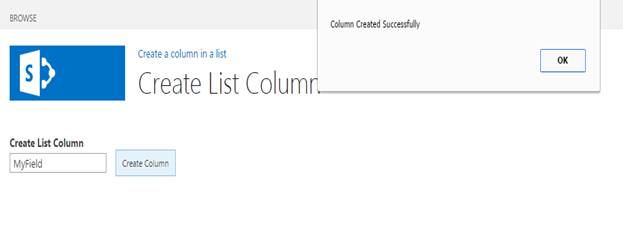
Once you click on the button you will receive an alert that your column has been successfully created.
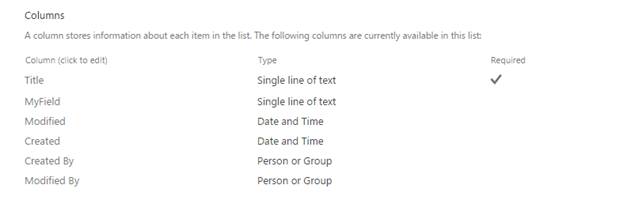
Go to your list, you will see your created column.
Here we saw today how to create a column in a list using REST API in SharePoint Online and Office 365. You will love your app. Keep reading and keep learning!
Keep reading & keep learning!


Comments