
Create Your Own Cryptocurrency in Private Consortium Network Ethereum Azure Blockchain
- The Tech Platform

- Feb 9, 2021
- 7 min read


Send Custom Cryptocurrency MetaMask
The words Blockchain and Cryptocurrency have been successful in disrupting the market for such a long time now, the effects they have made in the industry is massive. It looks like it has its own future, so thought to write something about it. In this article, we will create our own cryptocurrency and our own private consortium network in Azure. We will be using Ethereum proof of work consortium solution from Azure. Sounds interesting? If yes, let’s just skip the introduction and jump in. I hope you will like this article.
Background
We will be splitting this article into three parts.
Introduction to Blockchain and Cryptocurrency
Create your Own Private Consortium Network in Azure
Create your Own Private Cryptocurrency
What are Blockchain and Cryptocurrency
Blockchain
We can summarize blockchain as the preceding points.
It is a growing chain/list of blocks with records in it
These blocks are linked or chained with Cryptography
Each block will have its own unique cryptography hash
Each block will be having a “Previous Hash” property which is the hash of the previous block
The first block of the chain is known as Genesis block, only this block will not have the property “Previous Hash”
Hash, Previous Hash, Data, Timestamp are the minimum contents of a block
Here, the Data can be anything, for example, it can be the Transaction details like “Amount Transferred”, “Sender”, “Receiver” etc.
Why Blockchain is resistant to data modification?
By design, the Blockchain is resistant to modification of the data. Why? Each block in Blockchain will have its own unique cryptographic hash and previous hash property. Let’s say the Hash will be regenerated each time when there is a modification of data, timestamp. So, if you do any modification in any blocks, the hash property will be changed to a different one, and the previous hash property of the next block will be invalid, and so on. So, the entire network will have to undergo the update process, which is technically impossible.
Whenever there is an update, a new block will be generated and the same will be chained to the network by taking the hash property of the last block, as its previous hash property.

BlockChain
Real-time scenarios where Blockchain can be used?
The feasibility of Blockchain is almost everywhere, you can think about the scenarios where the same can be applied. I will share a few places where it can be used.
What if all of our Government documents are considered as a block? The forgery in documents will become an impossible task. Isn’t it?
With the help of Smart Contract, we can use Blockchain even for some business scenarios, where the real-time validations are required, where each stage can be treated as a block.
Cryptocurrency
A Cryptocurrency is a digital currency, which uses strong Cryptographic security, unlike the physical currencies like notes, coins, it doesn’t have any physical form. All the transactions of Cryptocurrency are verified through the network nodes and everything will be recorded in a Blockchain.
The most famous Cryptocurrency in the world is Bitcoin, which was invented by an unknown person or a bunch of people, known as Satoshi Nakamoto, this is the same who was invented Blockchain.
We all send and receive money to our accounts, but use someone as a mediator, that is Bank. Now, what if we remove that mediator and replace it with a Blockchain? That’s where the Cryptocurrency stands. With the help of Cryptocurrency and Blockchain, we don’t need to worry about the security, transaction costs which we are charged high from the bank. I personally feel that there will a time coming where there is no physical currency anymore.
Create Your Own Cryptocurrency
We are one step away from creating our own Cryptocurrency. Before we do that, we should create a private Consortium Network where we can add Blockchain. There are two things you must consider in your mind,
Coin
Token
A Coin is a Cryptocurrency where it uses its own Blockchain, whereas a Token is a Cryptocurrency which uses the existing Blockchain. For example, the Bitcoin uses its own Blockchain. We are going to use an existing Blockchain, which is nothing but Ethereum.
Let’s create an Ethereum account.
Creating an Ethereum Account
To work with Ethereum Blockchain, we need an Ethereum account, in this step, we will see how we can create one. There are many ways we can do this, one of them is using an existing tool called MetaMask. You can consider it a Wallet/Bank where you can create new accounts and do the transactions. You can install MetaMask via a Google Chrome extension, where you can create the Ethereum account and get registered in the network. To install the same, go to the Chrom web store and search for MetaMask, and click on Add to Chrome.
Once you have installed the extension, you will be redirected to a welcome page, you can also go to the page manually by clicking on the new extension icon. Continue the process until the page “Secret Backup Phrase”, this is where you will get your backup phrase, which can be used to restore your accounts in case, you forget the password. So please make a copy of the same. Once you completed all the steps, an account will be generated for you in the Main Network.

MetaMask Account
As you can see that it has already generated a public cryptography id for your account, now consider this is your account id. You can always change the network you wish, as there are many other networks available, but we will be adding our own private network later using the custom option. For now, please remember to change it to any test network.

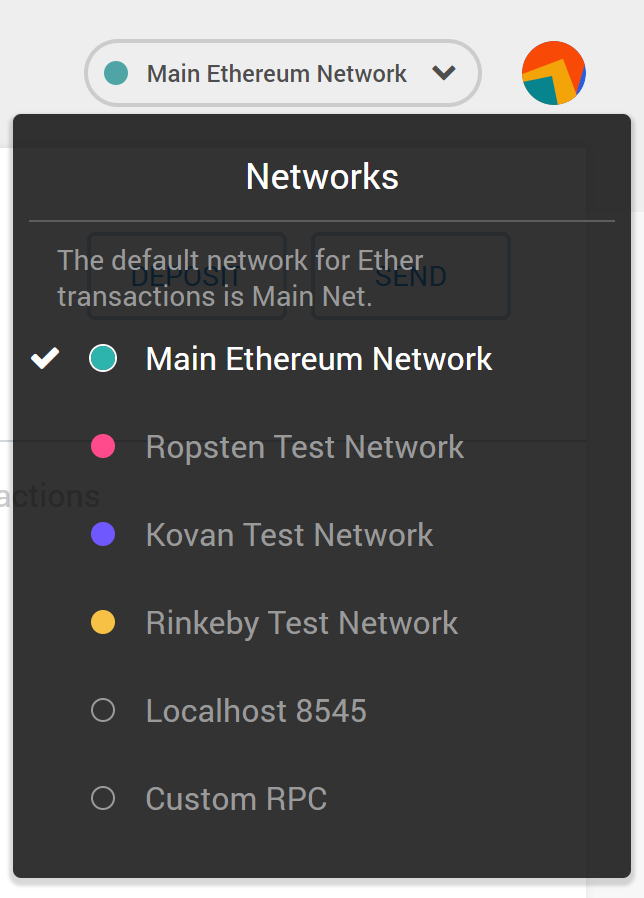
Ethereum Networks
Create Smart Contract
Luckily, to develop our own Token, we don’t need to download any IDE, as Ethereum provides its own online IDE, which is the remix. Go to the IDE, that’s where we are going to develop our own Cryptocurrency. The language used to program here is Solidity, it is a high-level object-oriented programming language used for creating smart contracts.
To create the token, we need to write some codes in Solidity, let’s do that now. Copy the codes below and paste it in the Remix editor, here I have named my Token as SibiCoin. You can use anything you wish.
The first step of the solidity program will start with defining the compiler.
pragma solidity >=0.4.22 <0.6.0;Once you had edited the token code, you can navigate to the compile tab and compile your code. You can also check the Auto Compile option which will enable the auto-compilation of the code whenever you make any changes.

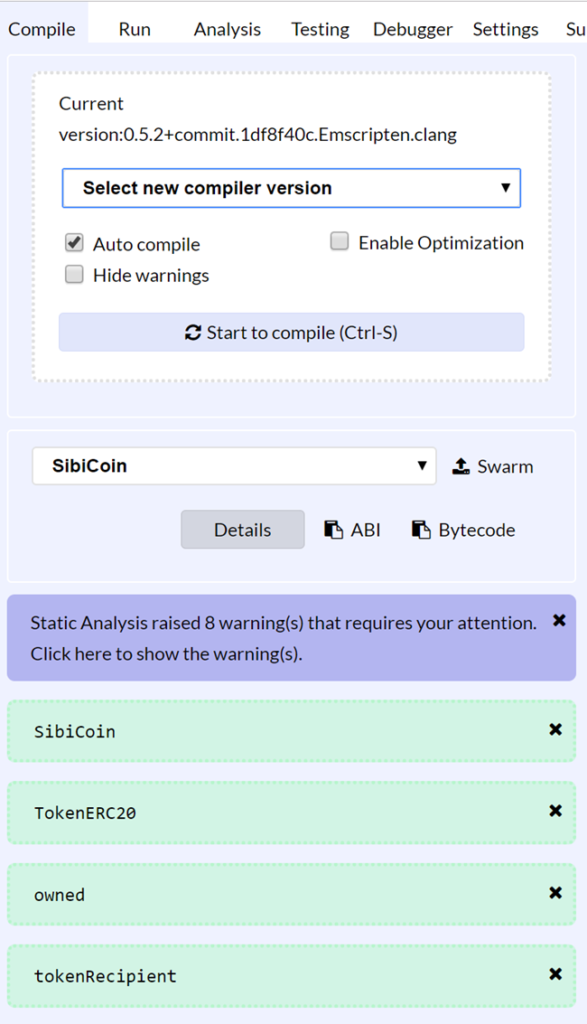
Ethereum Remix Solidity Compiler
Once the compilation is successful, you can go to the Run tab. As you can see the account you had created in MetaMask is been already populated for you.

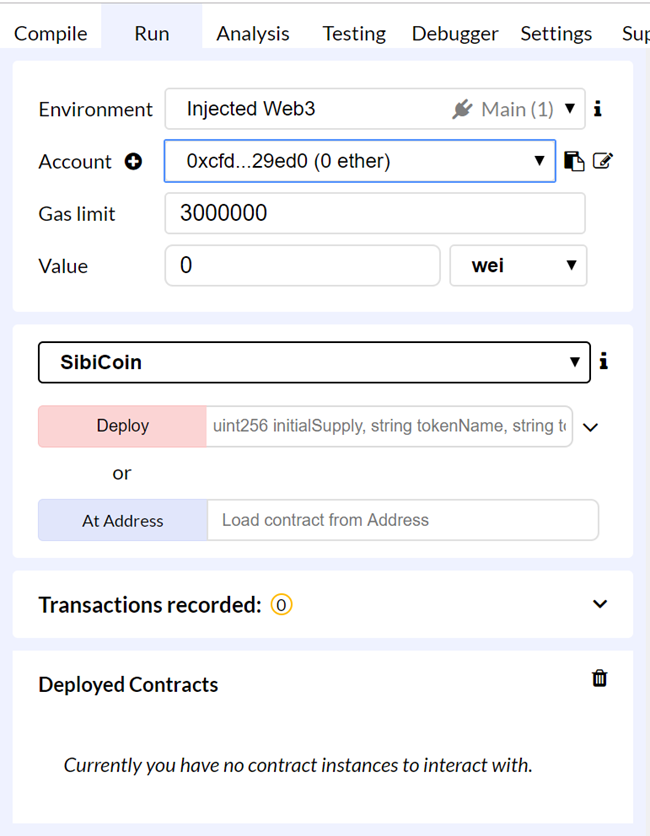
Ethereum Remix Solidity Run
Now, it is time to deploy our coin in the network, but when you do that you will get an error as “ALERT: Insufficient funds”. This is because that you have only 0 ETH in your account, but no worries, we will find a way to make you rich. Let’s create our own private consortium network now so that we can send money to your account. Are you ready to become rich?
Create Your Own Private Consortium Network
Creating the Network
Login to your Azure portal, and search for “Ethereum Proof-of-Work Consortium”. This is a super handy solution created by Microsoft for the Blockchain enthusiastic people. It deploys an Ethereum network, consisting of a set of transaction nodes and a set of mining nodes to record transactions. It may take between 30 minutes to do all the provision. I would create a separate resource group for this.
Once everything is created, you should be able to go to the resource group and see all the resources created.

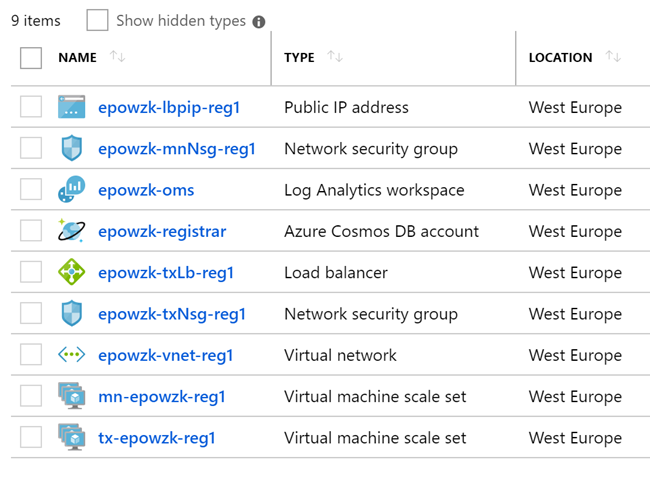
Azure Resources
Now, click on the resource with the type Public IP address, and copy the DNS name and open in the browser. You should be able to see a page as below.

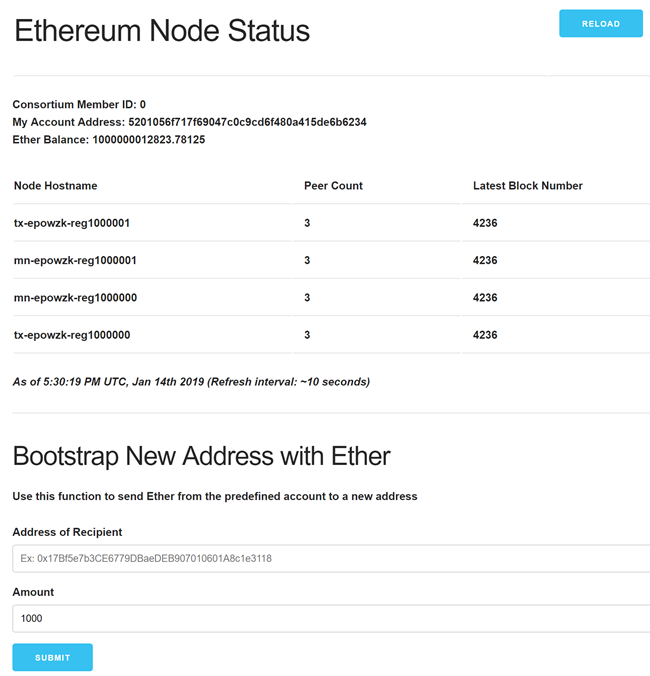
Ethereum Node Status Azure DNS Name
Here the nodes start with “tx-” are the transaction nodes and the nodes start with “mn-” are the mining nodes. Mining is the process of validating and approving the transactions happening and registering them in the ledger or Blockchain.
Send Ethereum to Accounts
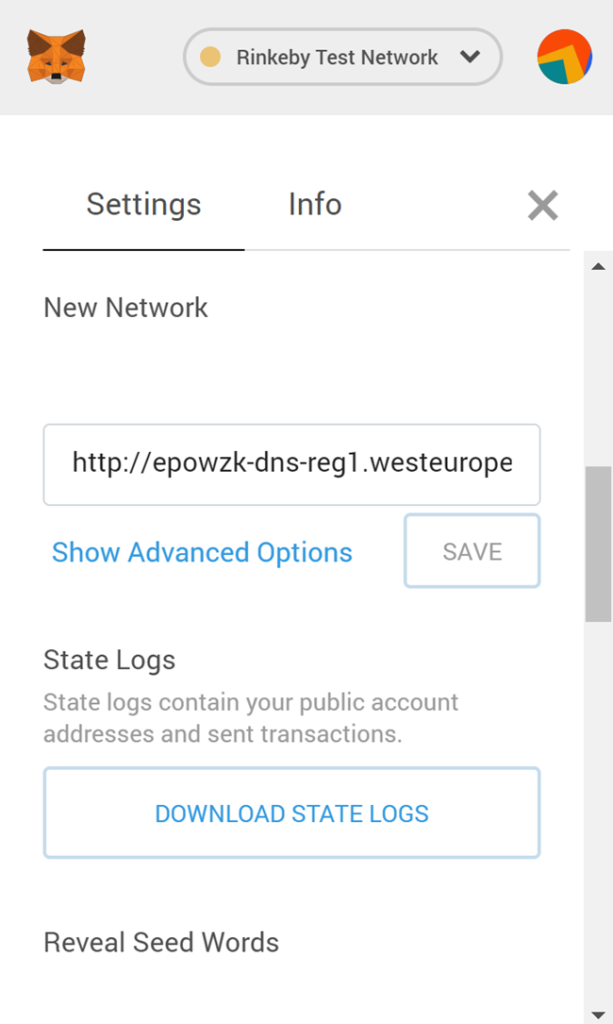
As our Private network is ready we can potentially change the MetaMask account network from the Test network to the network we have created. Click on the Network and then Custom RPC, in the new Network text box, you can give the DNS name we have generated earlier. Please remember that the default port is 8545.

New Network in MetaMask Ethereum
As we have already connected the MetaMask to our own private network, now we can easily send the Ethereum to this account from our Network. Go to the network and paste the MetaMask account public cryptography key and click submit.

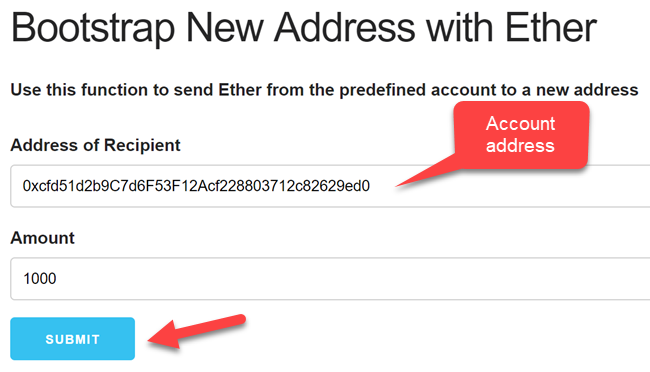
Send Ethereum to Accounts
If everything goes well, you should get a message as “Ether sent!”. You should also see that the new blocks are getting generated in both Transaction nodes and Mining nodes. Now We can check our MetaMask account. I can’t wait to see that, I become rich.

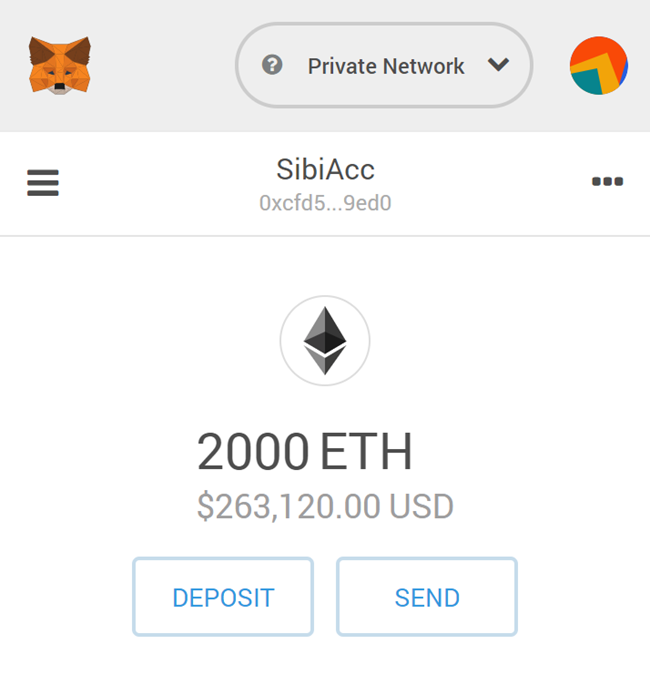
MetaMask Private Account
Wow!. Now I feel like I have a currency printer. Now we can go and create the smart contract.
Deploy the Smart Contract to Private Network
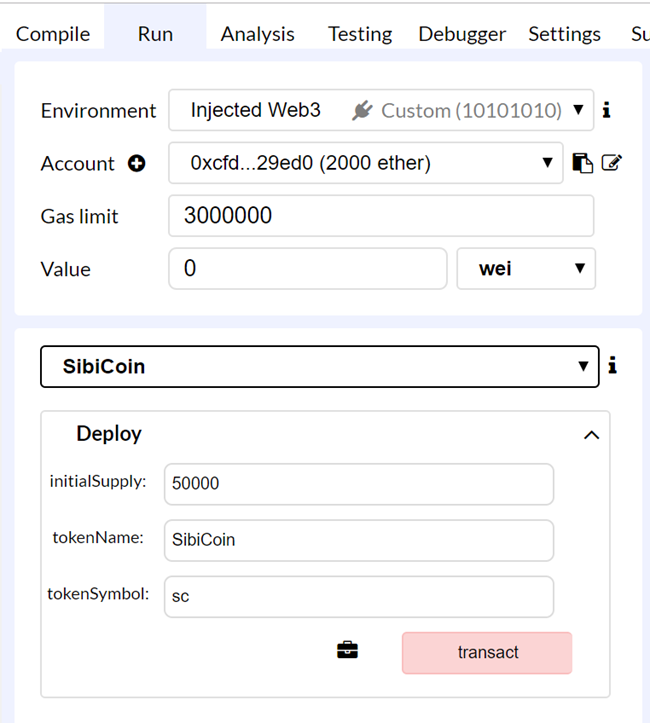
Now let’s just go to the Remix IDE and compile our smart contract and deploy the Token.

Deploy Custom Cryptocurrency
Here, you can see that our account is showing as 2000 ether. Before you deploy the Token/Coin, you should give the value for initialSupply, which is the maximum supply available for this contract, and the tokenName, which is the name of the coin, in this case, it is SibiCoin, and tokenSymbol, which is the symbol of your token. Once you have filled everything, you can click on the transact button.
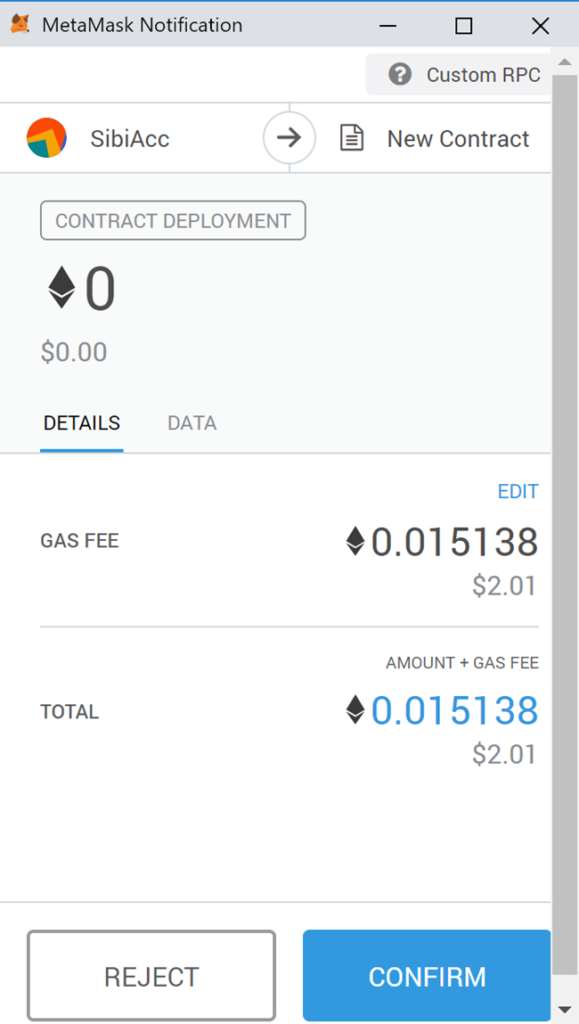
A MetaMask pop-up will be generated, click on the Confirm button. If you don’t see the pop-up, please click on the MetaMask Chrome extension button.

Initial Deployment of Smart Contract
If everything goes well, you should be able to see an alert as the transaction is confirmed.
MetaMask Transaction Confirmed
You should also see a deployed contract under the Deployed Contracts section, copy the token and add it to your existing MetaMask.

Smart Contract Token Generated
Add Custom Token to MetaMask Account
To add, go to the MetaMask account details and click on Add Token, and provide the token address.

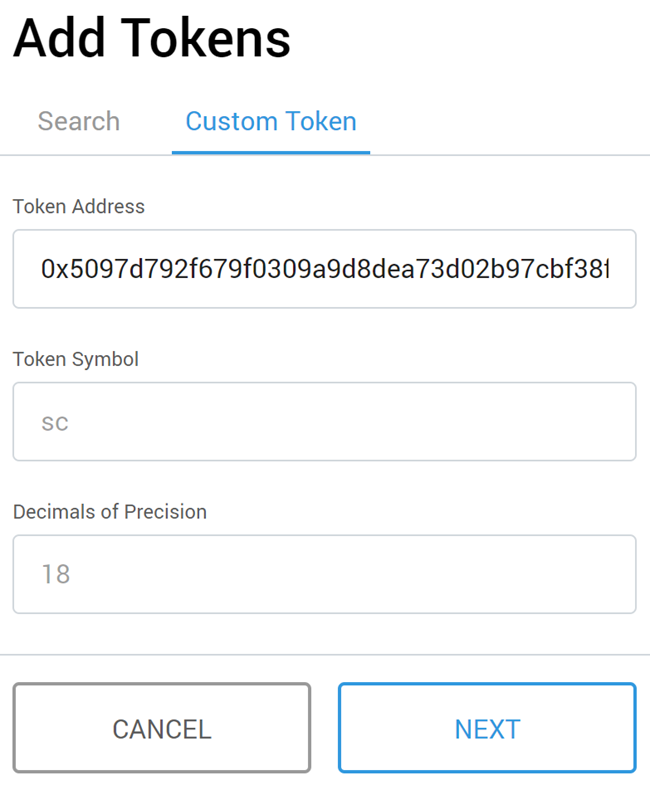
Add Custom Token to MetaMask
If you want to change the Decimal Precision, you should edit the same in your custom Solidity code. Once you have added the same you should be able to see 50000 sc (SibiCoin) in your account.
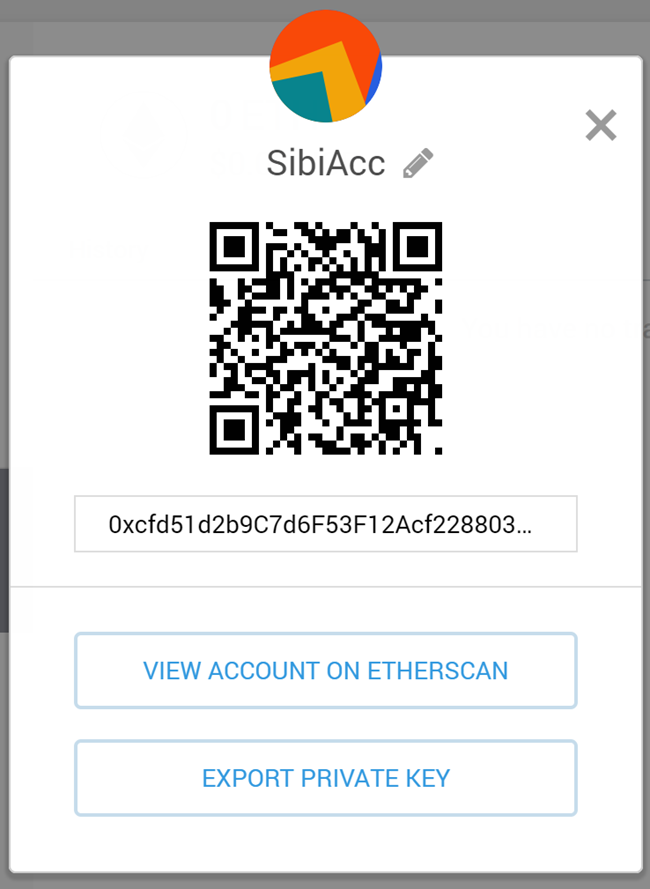
Sending Custom Coin from One to Another Account
To send our SibiCoins from our account “SibiAccount”, we should create a new account, for now, I will call it “SibiAccount 2”. Now let’s just copy the address of the second account and send some coins, yes, of course for free. Please make sure that you have added the Smart Contract Token in the second account as well.

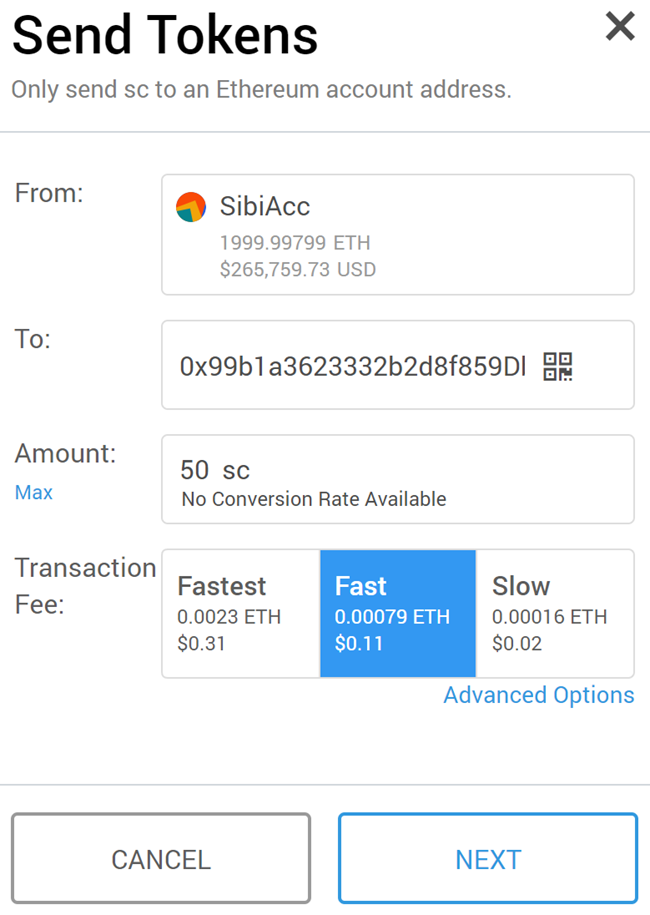
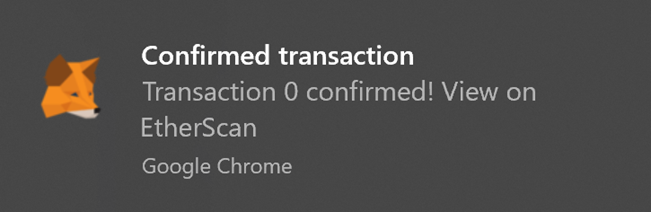
Send Custom Cryptocurrency MetaMask
Once the transaction is approved, you will get a notification and the coins should be reflected in your second account.
Source: paper.li
The Tech Platform


As blockchain technology continues to evolve, ensuring secure, instant, and accessible solutions remains crucial. At Zert, our mission to democratize finance aligns perfectly with this endeavor. With our world-class platform, fully licensed/pending on three continents, users can explore the potential of private consortium networks with confidence. Join us in unleashing the power of blockchain technology and crafting your own digital assets within a secure ecosystem.