
Introduction to Controller in ASP.NET Core
- The Tech Platform

- Jul 29, 2022
- 4 min read

What is Controller ?
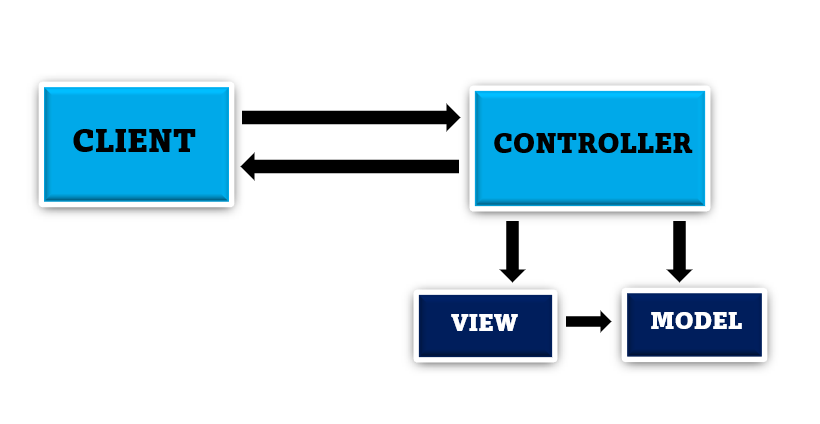
The Controller in MVC architecture handles any incoming URL request. The Controller is a class, derived from the base class System.Web.Mvc.Controller. Controller class contains public methods called Action methods. Controller and its action method handles incoming browser requests, retrieves necessary model data and returns appropriate responses.
In ASP.NET MVC, every controller class name must end with a word "Controller". For example, the home page controller name must be HomeController, and for the student page, it must be the StudentController. Also, every controller class must be located in the Controller folder of the MVC folder structure.
How it works?
When the client (browser) sends a request to the server, then that request first goes through the request processing pipeline. Once the request passes the request processing pipeline, it will hit the controller. Inside the controller, there are lots of methods (called action methods) actually handle that incoming HTTP Request. The action method inside the controller executes the business logic and prepared the response which is sent back to the client who initially made the request.
Important points:
The Controller handles incoming URL requests. MVC routing sends requests to the appropriate controller and action method based on URL and configured Routes.
All the public methods in the Controller class are called Action methods.
The Controller class must be derived from System.Web.Mvc.Controller class.
The Controller class name must end with "Controller".
A new controller can be created using different scaffolding templates. You can create a custom scaffolding template also.
How to add Controllers in ASP.NET Core Application?
If you create the ASP.NET Core Application using the MVC Project Template, then by default it will create a controller called HomeController within the Controllers folder. But if you create the ASP.NET Core Application with Empty Project template, then by default you will not find the Controllers folder in your project. As we are going to discuss everything from scratch, so we will create the ASP.NET Web Core Application with Empty Template and will add the Controllers folder and the Controllers manually.
Step1: Creating Empty ASP.NET Core Web Application
Create an ASP.NET Core Web Application with an Empty Project template. You can give any name to your application. I am giving the name for My Application as FirstCoreMVCWebApplication. The project will be created with the following folder structure and you can see there is no such folder called Controllers.

Step2: Adding Controllers folder
Once you create the project, next we need to add the Controllers folder where we will create our Controllers. To do so, right-click on the project and then select the add => new folder option from the context menu which will add a new folder in your project. Just rename the folder as Controllers.
Step3: Adding Controller
Once you create the Controllers folder, next we need to add a controller (StudentController) inside this Controllers folder. To do so, right-click on the Controller folder and select the Add => Controller option from the context menu which will open the Add Controller window as shown in the below image.
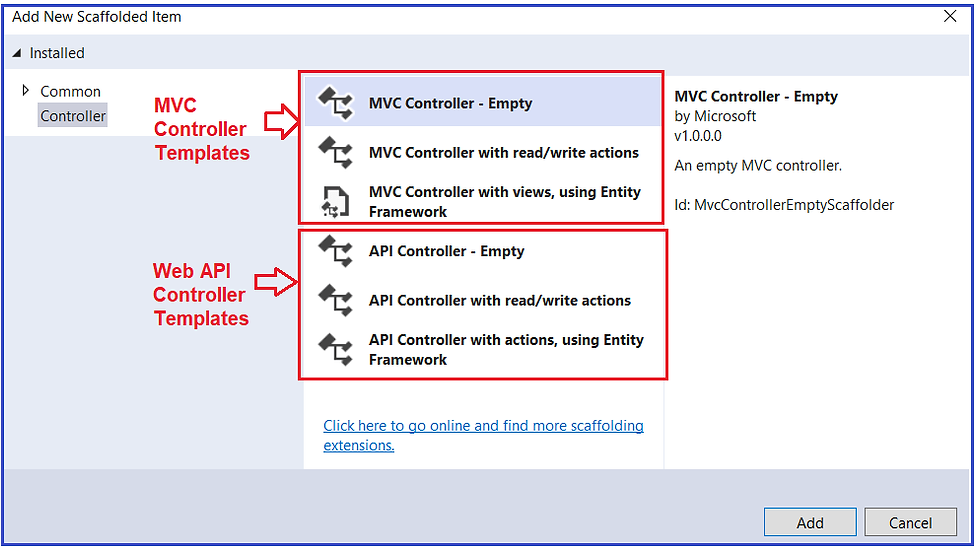
As you can see in the above image, we have three templates to create an MVC controller as well as three templates to create a Web API Controller. As we are interested MVC Application, so you can use any of the following three templates:
MVC Controller – Empty: It will create an Empty Controller.
MVC Controller with read/write actions: This template will create the controller with five action methods to create, read, update, delete, and list entities.
MVC Controller with views, using Entity Framework: This template will create an MVC Controller with actions and Razor views to create, read, update, delete, and list entities using Entity framework.
Here, we are going to create the MVC Controller with the Empty template. So, select the MVC Controller – Empty option and click on the Add button as shown in the below image.

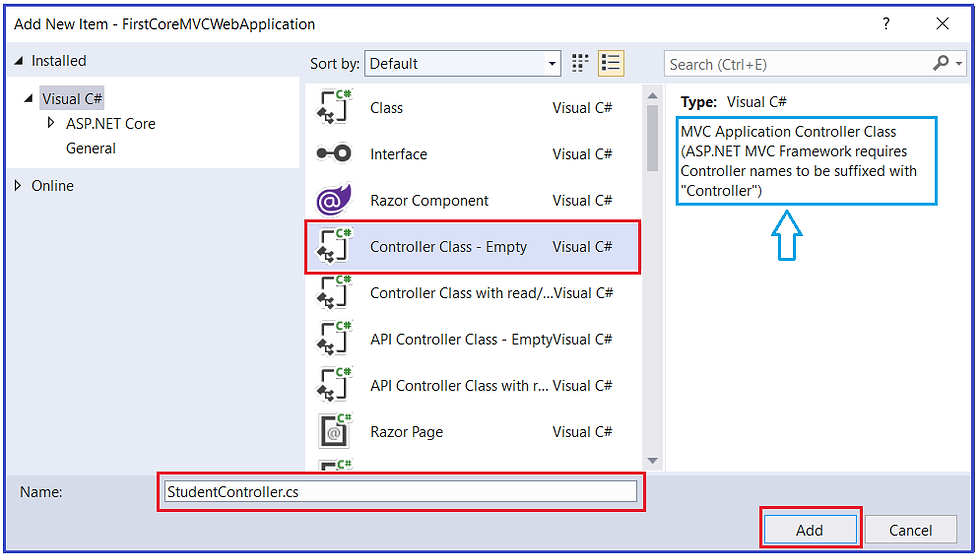
Once you click on the Add button, it will open the below window where you need to select the Controller Class – Empty option and give a meaningful name to your controller. Here, I am giving the name as StudentController and click on the Add button. Here, the point that you need to remember is the Controller names should be suffixed with the word Controller.
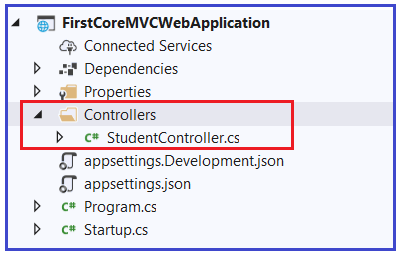
Once you click on the Add button then it will add StudentController within the Controllers folder as shown in the below image.
Understanding StudentController:
Now let us understand the StudentController class and the different components of this class. First of all, it is a class having a .cs extension. Open the StudnetController.cs class and you should get the following default code in it.
using Microsoft.AspNetCore.Mvc;

namespace FirstCoreMVCWebApplication.Controllers
{
    public class StudentController : Controller
    {
        public IActionResult Index()
        {
            return View();
        }
    }
}
As you can see in the above image, the StudentController class is inherited from the Controller class, and this controller class present in Microsoft.AspNetCore.Mvc namespace and that’s why it import that namespace. Now right click on the Controller and select go to the definition and you will see the following definition of Controller class.
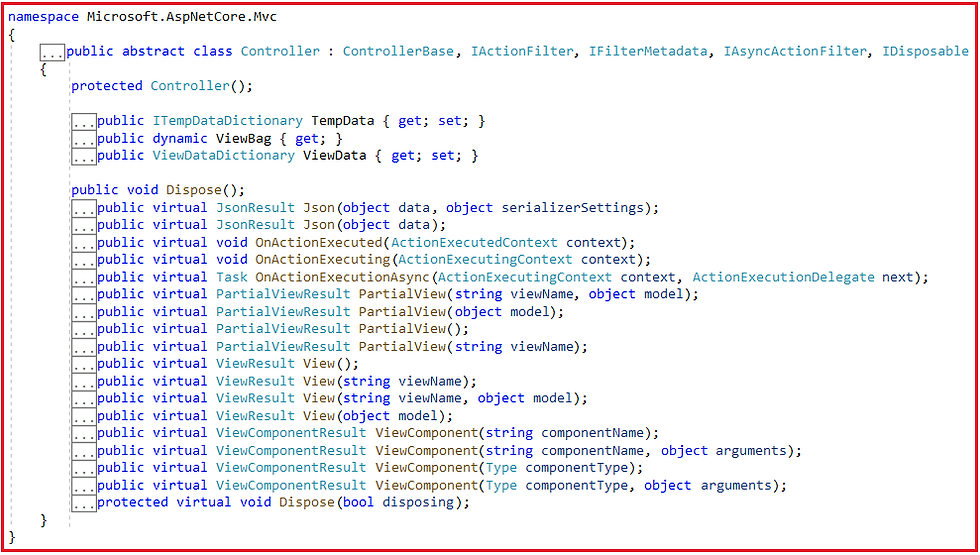
As you can see in the above image, the Controller has many methods (Json, View, PartialView, OnActionExecuting, etc) and properties (TempData, ViewBag, ViewData, etc.) and the point that you need to remember is these methods and properties are going to used when we are working with ASP.NET Core MVC Application. Again, if you look this Controller class is inherited from the ControllerBase class.
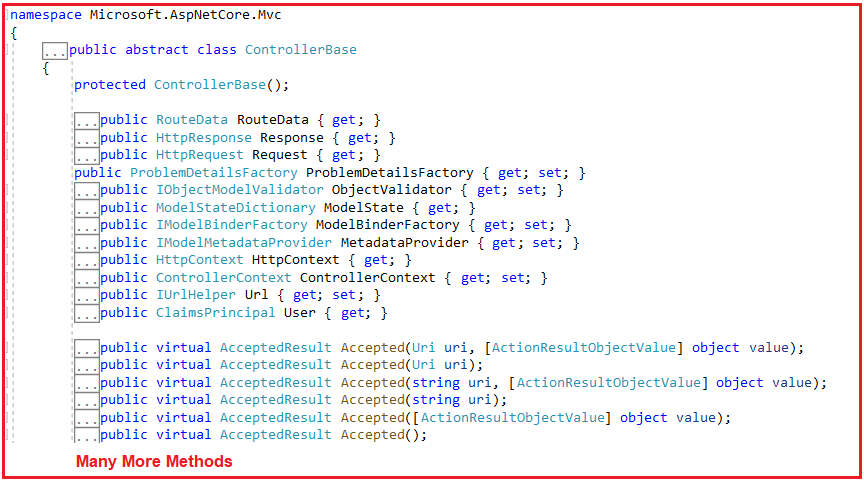
Let us see the ControllerBase class as well. Right-click on the ControllerBase class and select go to definition and you will see the following definition. Here, you will see the RequestData, Response, Request, ModelState, Routing, Model Binder, HttpContext, and many more which we are going to use as part of our ASP.NET Core MVC Application.
Resources: dotnettutorials.net
The Tech Platform


Comments